How to Install 3-Coat Stucco Wire: Lath, WRB, Laps & Embedment
Written by Stucco Champions — Southern California’s Authority on Exterior Plastering.
How to Install 3-Coat Stucco Wire: Lath, WRB, Laps & Embedment
In a traditional three-coat stucco system over framed walls, the “wire” is not just something that holds wet cement in place. Metal lath or woven wire plaster base supports the plaster, helps create mechanical key, and must work with the water-resistive barrier, flashing, accessories, control joints, and fasteners. A poor lath installation can cause cracking, poor embedment, corrosion exposure, and weak plaster support.
The technical baseline is ASTM C1063 for lathing and furring and ASTM C926 for portland cement plaster application. This article explains the practical checkpoints, but local code, project specifications, and product instructions still control the final installation.
Free Assessment
Noticing Stucco Damage?
Get a free on-site assessment from a licensed contractor. $0 deposit, no obligation.
GET FREE ASSESSMENT1. Use a plaster base approved for stucco
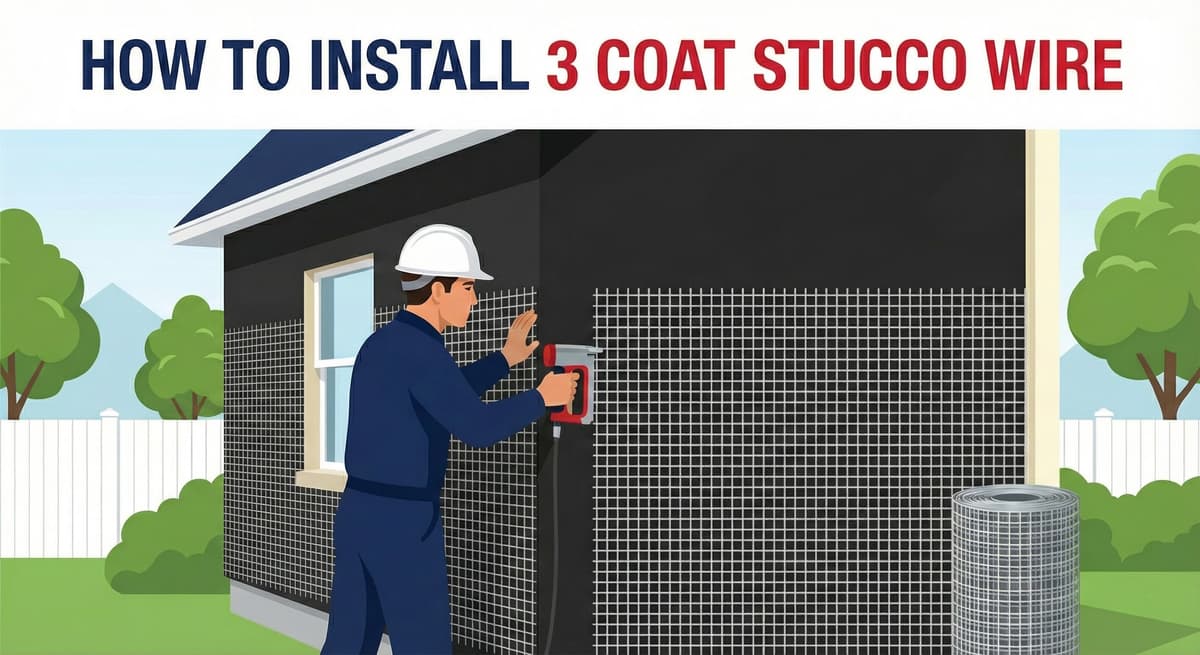
Three-coat stucco over framed construction commonly uses galvanized expanded metal lath, woven wire plaster base, or welded wire lath products that meet the relevant ASTM standards and manufacturer instructions. Avoid casual jobsite shorthand when specifying work; the plaster base needs to be a code-appropriate stucco lath, not generic wire netting.
Self-furring lath or furring attachments are important because plaster must key around the metal. The SMA guide notes that furring holds lath off the water-resistive barrier so cement can key into and around the lath. Flat lath pressed tight to the backing can reduce embedment.
2. Install the WRB before the lath
On framed exterior walls, the water-resistive barrier is installed behind the lath and integrated shingle-fashion with flashings. The WRB is not a cosmetic layer; it is part of the moisture-management system. Reverse laps, torn paper, unsealed penetrations, and poorly integrated flashing can create leaks even if the plaster looks good.
Before lath goes on, confirm window and door flashing, roof-to-wall flashing, deck transitions, penetrations, and weep screed details. Once the lath is installed, those mistakes are harder to correct.
3. Lap paper-to-paper and metal-to-metal
Paper-backed lath must be lapped so the paper laps with paper and the metal laps with metal. PCA guidance warns that a metal-to-paper sequence can reduce plaster thickness, interfere with embedment, and contribute to cracking at laps.
ASTM C1063 guidance summarized in PCA material includes minimum lapping requirements such as side laps and end laps, plus proper lath-to-lath configuration. The exact lap, fastener, and support spacing should follow the current standard, local code, and manufacturer data for the selected lath.
4. Fasten into the structure, not just sheathing
Lath needs to be securely attached to framing or an approved backing. Fastener type, length, corrosion resistance, spacing, and pull-out resistance matter. Staples, nails, screws, or other fasteners should match the substrate and code requirements. In coastal or high-moisture exposure, corrosion resistance becomes even more important.
Do not rely on random fastening into sheathing if the assembly requires attachment into studs or framing. Loose lath moves during plastering and can create hollow areas, cracking, or poor keying.
5. Respect openings, corners, accessories, and control joints
Openings and corners need careful lath layout. Avoid creating weak lap conditions at reentrant corners around windows and doors. Accessories such as corner beads, casing beads, weep screeds, control joints, and expansion details must be installed before plaster and coordinated with the lath.
Control joints are not just surface grooves. Where true control joints are used, the lath should terminate properly at each side according to the design. Continuing lath straight through a control joint can defeat the purpose of the joint.
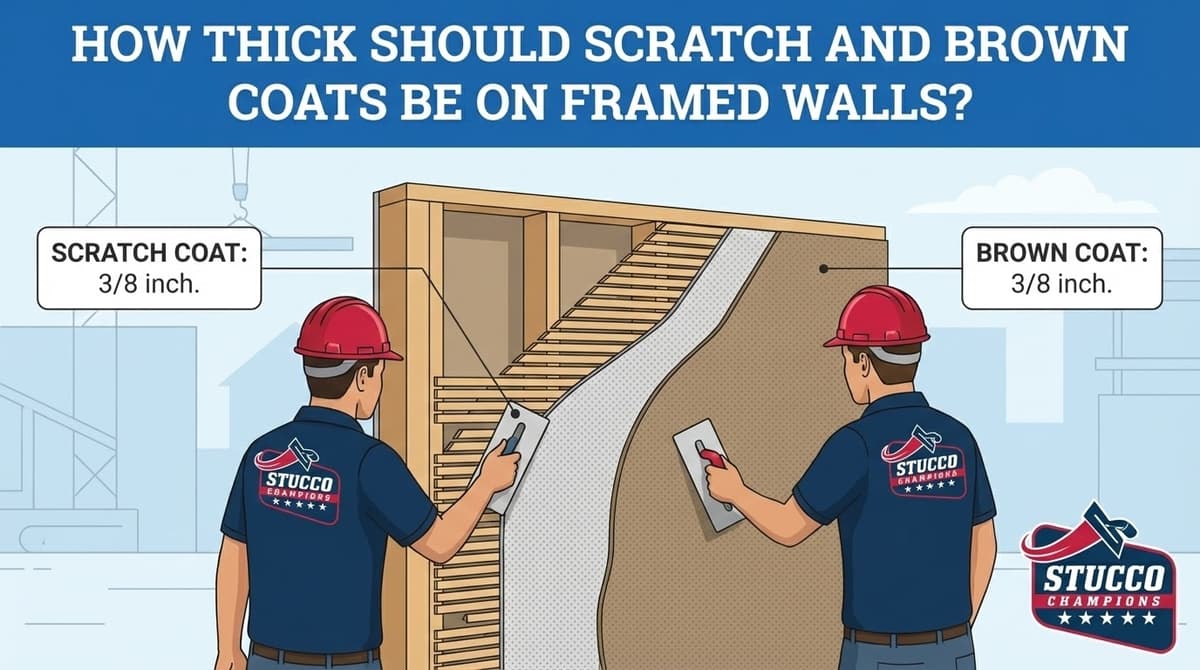
6. The scratch coat must fully embed the lath
Lath installation is not complete until the scratch coat is applied correctly. PCA guidance states that the first coat must fully embed the lath and cover it with enough material to allow scratching without revealing metal. If the lath is visible after scratching, the plaster is too thin or embedment is poor.
The scratch coat should be forced through and around the lath, then scratched horizontally to create a mechanical key for the brown coat. Excessive troweling, dry substrates, poor mix consistency, or loose lath can all reduce the quality of the base.
7. Common lath installation mistakes
- using generic wire instead of approved stucco lath;
- installing lath flat without proper furring or self-furring;
- reverse-lapping WRB or paper-backed lath;
- fastening into weak sheathing instead of approved framing or backing;
- burying or blocking the weep screed;
- bridging control joints with continuous lath;
- leaving lath exposed after the scratch coat.
Bottom line
Good 3-coat stucco wire installation is really a lath-and-moisture-management installation. Use approved galvanized plaster base, lap the WRB and paper-backed lath correctly, fasten to the proper structure, coordinate accessories and joints, and fully embed the lath in the scratch coat. If any of those steps are treated casually, the finish coat cannot make up for it later.
Frequently Asked Questions About Stucco
How much does stucco repair cost in Orange County and Los Angeles?+
Stucco repair typically ranges from $500 for minor crack patching to $5,000+ for full re-stucco of a single elevation. The exact cost depends on the damage type (hairline cracks, water damage, delamination, weep screed failure), the square footage involved, and whether the original three-coat or one-coat stucco system needs to be matched. Stucco Champions provides fixed-price written estimates after a free on-site assessment — no hourly billing, no surprise change orders. See our stucco repair cost guide for detailed pricing by repair type.
How long does stucco last in Southern California?+
Properly installed three-coat stucco lasts 50-80+ years in Southern California's climate. The most common failure points aren't the stucco itself — they're the supporting components: corroded weep screed, deteriorated building paper behind the stucco, and improperly sealed window flashing. Most "stucco failures" are actually moisture-intrusion failures that start at one of these points. Annual visual inspection catches problems before they spread, which is why we offer free weep screed assessments for homeowners in our service area.
Can I repair stucco myself, or do I need a contractor?+
Hairline cracks under 1/8 inch wide can be sealed with elastomeric caulk by a homeowner. Anything larger — pattern cracks, delamination (where stucco pulls away from the wall), water-damaged areas, or chimney/window leak repairs — requires a licensed contractor. Improper DIY repair on these is the #1 cause of repeat failures because the underlying cause (usually moisture) isn't addressed. California's CSLB requires a license for any stucco work over $500. Looking for a highly-rated stucco contractor in Southern California? We are a CSLB-licensed and insured team ready to help.
How do I know if I need stucco repair vs. full re-stucco?+
If less than 30% of an elevation has visible damage, repair is the right call. If you see large areas of cracking, multiple zones of delamination, or the underlying paper and lath have rotted across an entire wall, full re-stucco of that elevation is more cost-effective long-term. Our free assessment includes a moisture survey and lath inspection so you get a defensible recommendation either way — not just a quote pushing whichever option costs more.
Do you offer warranties on stucco work?+
Yes. Stucco Champions provides a written 5-year workmanship warranty on all stucco repairs and a 10-year warranty on full re-stucco. We're a CSLB-licensed and insured contractor (license #1122006 — verifiable at cslb.ca.gov), which means our work is backed by California's contractor licensing board, not just our own promise. Request a free estimate to see the warranty terms in writing before you sign anything.
How long does a stucco repair take?+
Most patch repairs are completed in 1-2 days, including a 24-hour cure time before texture matching and color application. Full re-stucco of a single elevation runs 5-7 working days because each coat (scratch, brown, finish) needs to cure properly before the next is applied. We schedule around weather — California stucco needs daytime temperatures above 50°F with no rain forecast for at least 24 hours after each coat. Our crew shows up on time, every time.