Stucco Scratch Coat Mix: Ratios, Sand, Water & Curing Rules
Written by Stucco Champions — Southern California’s Authority on Exterior Plastering.
Stucco Scratch Coat Mix: Ratios, Sand, Water & Curing Rules
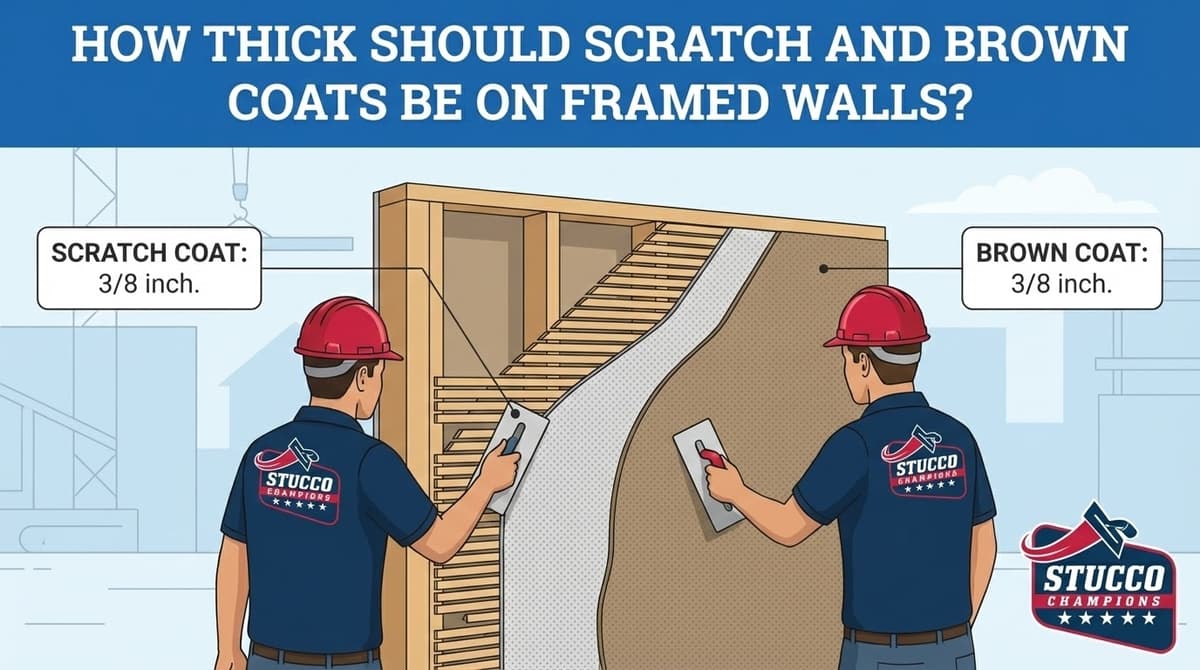
The scratch coat is the first base coat in a traditional three-coat stucco system. Its job is to embed the lath, bond to the substrate or plaster base, and create a rough mechanical key for the brown coat. It is important, but it should not be described as “structural” in the framing sense; stucco is a cladding/plaster assembly, not the structure of the building.
A good scratch coat depends on correct materials, proportioning, water control, application thickness, embedment, scratching, and curing. A bad mix can shrink excessively, crack, slump, fail to embed the lath, or lose bond.
Free Assessment
Noticing Stucco Damage?
Get a free on-site assessment from a licensed contractor. $0 deposit, no obligation.
GET FREE ASSESSMENT1. The basic plaster mix concept
PCA guidance describes portland cement plaster broadly as cementitious material, fine aggregate, and water. It notes that a simple effective combination is often one part cementitious material to about three or four parts fine aggregate by volume, depending on materials and local practice. The cementitious material may be portland cement with lime, masonry cement, plastic cement, blended cement, or another approved plaster cement depending on the specification and jurisdiction.
That means “one perfect recipe” is not universal. The mix should follow ASTM C926, project specifications, local code, and the cement manufacturer’s instructions.
2. Use plaster sand, not random sand
Sand gradation matters. Plaster sand should be clean, well graded, and appropriate for portland cement plaster. Very fine play sand, dirty sand, overly rounded sand, or poorly graded aggregate can affect workability, shrinkage, bond, and cracking. The goal is a workable mix with enough aggregate structure to reduce shrinkage while still allowing full embedment around lath.
If bagged premixed scratch-and-brown material is used, follow the bag and manufacturer data sheet. Do not add random cement, lime, admixtures, or extra sand unless the manufacturer allows it.
3. Add only enough water for workability
Water controls workability, but excess water increases shrinkage and weakens the plaster. The mix should be plastic enough to press through and around the lath without slumping off the wall. It should not be soupy, and it should not be so dry that it cannot bond or embed the lath.
Field crews often adjust water for weather, sand moisture, suction, and application method. Those adjustments should stay within the product and standard requirements. Re-tempering old material or adding water late to revive stiff plaster can create weak, inconsistent work.
4. Embed the lath completely
On metal lath, the scratch coat must be forced into the lath so the plaster surrounds and keys around the metal. PCA guidance states that the first coat must fully embed the lath and cover it with enough material to permit scratching without exposing the lath.
Visible lath after scratching is not a cosmetic issue. It means the scratch coat is too thin, poorly applied, or the lath is not positioned correctly. That can reduce corrosion protection and support for the following coats.
5. Scratch the surface for mechanical bond
After the scratch coat is applied and brought to the required thickness, the surface is scratched to create a mechanical key for the brown coat. Horizontal scratching is commonly used on vertical walls because it helps the next coat grip the base. Do not scratch so deeply that the lath is exposed.
The scratch coat should be firm enough to hold the grooves without tearing loose. Timing depends on weather, suction, mix, and application conditions.
6. Cure the scratch coat
Portland cement plaster develops strength through hydration. Proper curing reduces early moisture loss and helps the coat gain strength before the brown coat. Hot, dry, windy, or highly absorptive conditions can pull water out too quickly and increase cracking risk.
Follow ASTM C926, project specifications, and product instructions for moist curing and time between coats. The SMA guide notes that traditional portland cement plaster needs curing before finish work; rushing coats is a common source of performance and color problems.
7. Common scratch coat mix mistakes
- using ungraded or dirty sand;
- adding too much water for easier troweling;
- mixing products outside the manufacturer’s instructions;
- applying too thin over lath;
- scratching so deeply that metal is exposed;
- letting hot or dry weather pull moisture out too quickly;
- installing the brown coat over a weak, dusty, or poorly cured scratch coat.
Bottom line
A good stucco scratch coat mix is not just cement and sand in a bucket. It is an approved plaster mix, clean graded sand, controlled water, full lath embedment, proper scratching, and curing. Get those basics right and the brown coat has a reliable base; get them wrong and the finish coat will only hide the problem temporarily.
Frequently Asked Questions About Stucco
How much does stucco repair cost in Orange County and Los Angeles?+
Stucco repair typically ranges from $500 for minor crack patching to $5,000+ for full re-stucco of a single elevation. The exact cost depends on the damage type (hairline cracks, water damage, delamination, weep screed failure), the square footage involved, and whether the original three-coat or one-coat stucco system needs to be matched. Stucco Champions provides fixed-price written estimates after a free on-site assessment — no hourly billing, no surprise change orders. See our stucco repair cost guide for detailed pricing by repair type.
How long does stucco last in Southern California?+
Properly installed three-coat stucco lasts 50-80+ years in Southern California's climate. The most common failure points aren't the stucco itself — they're the supporting components: corroded weep screed, deteriorated building paper behind the stucco, and improperly sealed window flashing. Most "stucco failures" are actually moisture-intrusion failures that start at one of these points. Annual visual inspection catches problems before they spread, which is why we offer free weep screed assessments for homeowners in our service area.
Can I repair stucco myself, or do I need a contractor?+
Hairline cracks under 1/8 inch wide can be sealed with elastomeric caulk by a homeowner. Anything larger — pattern cracks, delamination (where stucco pulls away from the wall), water-damaged areas, or chimney/window leak repairs — requires a licensed contractor. Improper DIY repair on these is the #1 cause of repeat failures because the underlying cause (usually moisture) isn't addressed. California's CSLB requires a license for any stucco work over $500. Looking for a highly-rated stucco contractor in Southern California? We are a CSLB-licensed and insured team ready to help.
How do I know if I need stucco repair vs. full re-stucco?+
If less than 30% of an elevation has visible damage, repair is the right call. If you see large areas of cracking, multiple zones of delamination, or the underlying paper and lath have rotted across an entire wall, full re-stucco of that elevation is more cost-effective long-term. Our free assessment includes a moisture survey and lath inspection so you get a defensible recommendation either way — not just a quote pushing whichever option costs more.
Do you offer warranties on stucco work?+
Yes. Stucco Champions provides a written 5-year workmanship warranty on all stucco repairs and a 10-year warranty on full re-stucco. We're a CSLB-licensed and insured contractor (license #1122006 — verifiable at cslb.ca.gov), which means our work is backed by California's contractor licensing board, not just our own promise. Request a free estimate to see the warranty terms in writing before you sign anything.
How long does a stucco repair take?+
Most patch repairs are completed in 1-2 days, including a 24-hour cure time before texture matching and color application. Full re-stucco of a single elevation runs 5-7 working days because each coat (scratch, brown, finish) needs to cure properly before the next is applied. We schedule around weather — California stucco needs daytime temperatures above 50°F with no rain forecast for at least 24 hours after each coat. Our crew shows up on time, every time.