How Thick Is Stucco? The 7/8" Rule & Exterior Codes
Written by Stucco Champions - Southern California's Authority on Exterior Plastering.
When homeowners inspect cracks or plan an exterior renovation, the first question they ask is usually, "how thick is stucco supposed to be?"
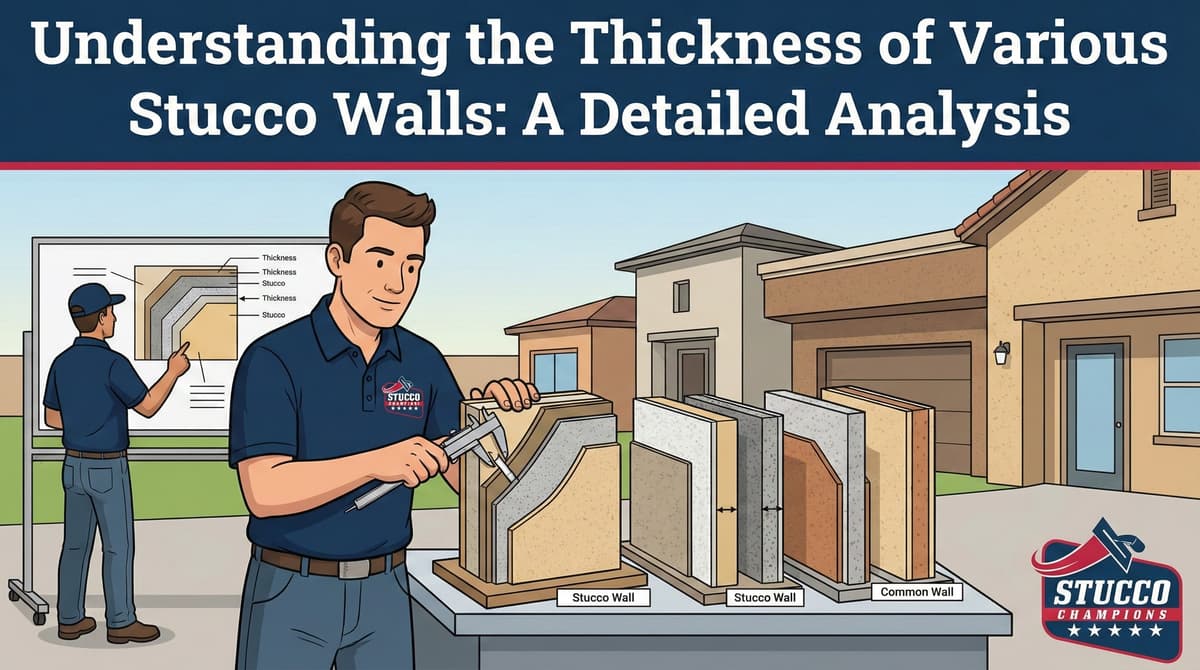
The answer is strictly regulated by building codes (specifically ASTM C926), but it depends entirely on the type of system installed on your house. For a traditional three-coat stucco system over wood framing and metal lath, the legal standard is exactly 7/8 of an inch thick. However, modern "one-coat" systems, synthetic EIFS, and stucco applied directly to concrete block all have vastly different thickness requirements.
If your exterior stucco is applied too thin, the metal wire lath will not be fully embedded, leading to severe structural cracking. If it is applied too thick, the immense weight of the cement can pull itself off the wall. This guide explains exactly how thick is stucco across different architectural systems.
Quick Answer: How Thick Is Stucco on a House?
| Exterior Stucco Assembly | Legal Code Thickness | What It Means |
|---|---|---|
| Traditional Three-Coat Stucco (Wood Framing) | 7/8 inch total | 3/8" Scratch coat + 3/8" Brown coat + 1/8" Finish coat over metal lath. |
| One-Coat Stucco Systems | 3/8 to 1/2 inch | Proprietary fiberglass-reinforced cement applied over foam board in a single heavy pass. |
| Direct to Masonry (Cinder Block) | 5/8 inch total | Applied directly to concrete block without wire lath (1/2" base + 1/8" finish). |
| The Color Finish Coat | 1/8 inch thick | The final decorative layer of color and sand texture. |
Free Assessment
Noticing Stucco Damage?
Get a free on-site assessment from a licensed contractor. $0 deposit, no obligation.
GET FREE ASSESSMENTHow Stucco Thickness Is Measured and Controlled
Plasterers do not just guess how thick is stucco while they are troweling it onto your house. The thickness is physically dictated by the metal accessories nailed to the wall before the cement is ever mixed.
Metal pieces like weep screeds, casing beads (around windows), and corner beads all have a specific depth (usually 7/8"). Plasterers use a long aluminum straight-edge (a "darby" or "screed rod") to drag the wet cement flush with these metal edges. If the contractor uses the wrong size metal accessories, the wall will inherently be the wrong thickness.
Do not smash a hole in your wall to measure the cement. To easily check how thick is stucco on your house, look at the bottom edge of the wall where the stucco meets the metal weep screed above the foundation. You can clearly see the profile thickness of the cement sitting inside the metal "V" channel.
1. Traditional Three-Coat Stucco (7/8 Inch)
If you own a classic Southern California home built before 1990, you almost certainly have a traditional three-coat system. When building inspectors are asked how thick is stucco, they are referencing this exact 7/8" standard.
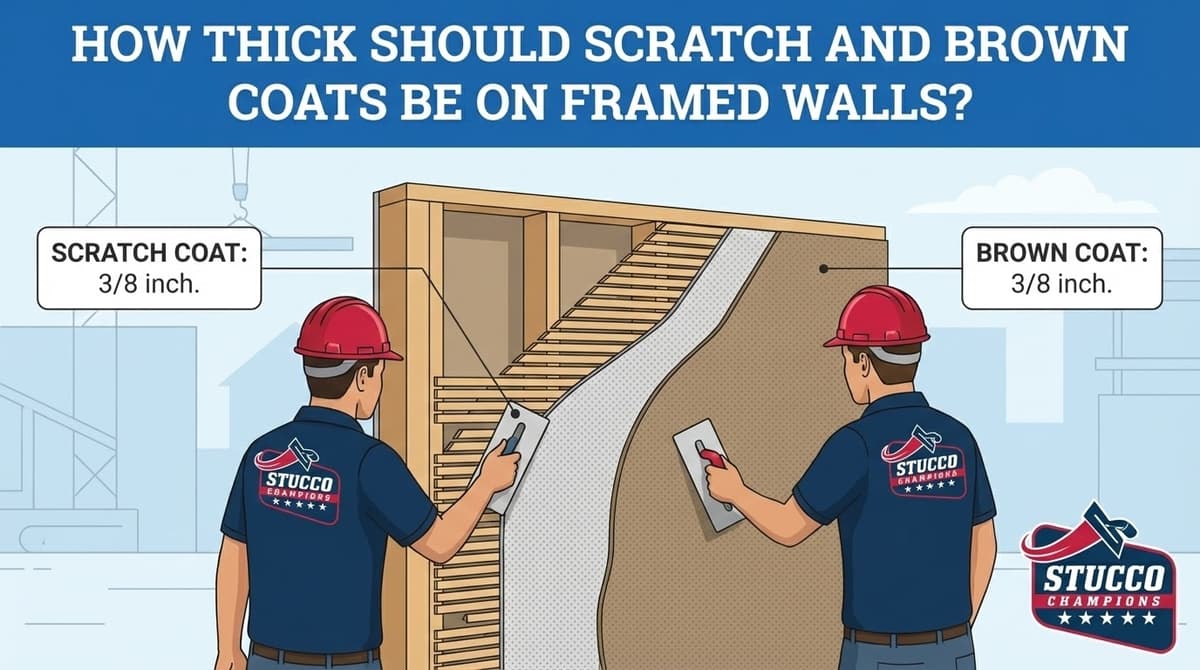
The 7/8-inch depth is achieved in three distinct layers:
- Scratch Coat (3/8"): The foundational layer. Wet cement is forcefully pushed deep through the metal wire lath to encapsulate it. Once firm, it is "scratched" with a comb to create deep horizontal grooves.
- Brown Coat (3/8"): The leveling layer. This cement fills the grooves of the scratch coat and creates a perfectly flat, plumb, and level "canvas" for the house.
- Finish Coat (1/8"): The final decorative layer containing the color pigment and the desired sand texture.
2. One-Coat Stucco Systems (3/8 to 1/2 Inch)
If you live in a newer tract home, your exterior might look identical to a 1950s Spanish home, but the engineering underneath is completely different.
Modern production builders often use "One-Coat" stucco to save labor time and improve energy efficiency. In this system, 1 to 2 inches of rigid EPS foam board is nailed to the plywood sheathing first. Then, a highly specialized, fiberglass-reinforced cement base coat is applied over the foam at only 3/8 to 1/2 inch thick. Finally, a standard 1/8-inch color coat goes on top.
If you drill into a one-coat house, you will hit soft foam almost immediately. This is not a defect—it is a code-approved proprietary system. For a deeper breakdown, see our guide on one-coat vs. three-coat stucco.
3. Stucco Over Concrete Block (5/8 Inch)
When plastering directly over rigid cinder block (CMU) retaining walls or foundations, the rules change entirely. Because a cinder block wall does not flex in the wind like a wood-framed house, it does not require flexible wire lath.
Since there is no wire lath to encapsulate, the stucco can be applied thinner. The standard for direct-apply masonry stucco is a two-coat system totaling 5/8 of an inch (a 1/2-inch leveling base coat followed by a 1/8-inch color finish).
Why Too-Thin Stucco Is a Structural Disaster
When homeowners ask how thick is stucco, it is often because they see a piece of their house chipping off and notice exposed metal wire underneath.
If a cheap contractor applies stucco at 1/2-inch thick on a traditional wood-framed house (instead of the required 7/8-inch), the metal lath will not be buried deep enough in the cement. The lath will sit too close to the surface, where rainwater can easily penetrate the thin finish coat. This causes the metal lath to violently rust, expand, and blow the stucco right off the wall (a process called "rust jacking").
Why Too-Thick Stucco Also Fails
More is not always better. Stucco is incredibly heavy (around 10 pounds per square foot at 7/8" thick). If a contractor tries to "build out" a badly framed wall by applying 2 inches of solid cement, the sheer dead weight of the plaster can cause it to delaminate and shear off the wall.
Furthermore, excessively thick cement cures unevenly, shrinking aggressively as the water evaporates, leading to massive "shrinkage cracks" across the entire elevation.
Scratch Coat Thickness vs. Total Stucco Thickness
Homeowners often search for scratch coat thickness, but the scratch coat is only one layer of a complete stucco wall. In a traditional three-coat system, the scratch coat is commonly about 3/8 inch, the brown coat is about 3/8 inch, and the finish coat is about 1/8 inch. Together, those layers create the familiar 7/8-inch exterior stucco assembly over metal lath.
The important detail is lath embedment. Portland cement plaster manuals explain that metal reinforcement has to be positioned and securely attached so plaster can surround it. If the scratch coat is too thin, the wire can sit too close to the weather barrier instead of being fully embedded in plaster. That is when straight-line cracking, rust stains, or hollow areas can start showing up.
If you are comparing wall systems, our one-coat vs. three-coat stucco guide explains why a thinner proprietary one-coat assembly is not the same thing as a too-thin traditional wall.
Conclusion: Does Your Wall Meet Code?
Understanding exactly how thick is stucco is critical for diagnosing wall failures. A traditional framed house requires 7/8" of cement to protect the wire lath, while modern foam-backed one-coat systems are engineered to function perfectly at 3/8".
If your stucco sounds hollow when you tap it, if you can see rusty wire mesh, or if large chunks are delaminating from the wall, your system was likely applied too thin. Contact Stucco Champions for a professional inspection. We can measure your wall's depth, diagnose the failure, and rebuild the system to strict ASTM standards.
Frequently Asked Questions About Stucco
How much does stucco repair cost in Orange County and Los Angeles?+
Stucco repair typically ranges from $500 for minor crack patching to $5,000+ for full re-stucco of a single elevation. The exact cost depends on the damage type (hairline cracks, water damage, delamination, weep screed failure), the square footage involved, and whether the original three-coat or one-coat stucco system needs to be matched. Stucco Champions provides fixed-price written estimates after a free on-site assessment — no hourly billing, no surprise change orders. See our stucco repair cost guide for detailed pricing by repair type.
How long does stucco last in Southern California?+
Properly installed three-coat stucco lasts 50-80+ years in Southern California's climate. The most common failure points aren't the stucco itself — they're the supporting components: corroded weep screed, deteriorated building paper behind the stucco, and improperly sealed window flashing. Most "stucco failures" are actually moisture-intrusion failures that start at one of these points. Annual visual inspection catches problems before they spread, which is why we offer free weep screed assessments for homeowners in our service area.
Can I repair stucco myself, or do I need a contractor?+
Hairline cracks under 1/8 inch wide can be sealed with elastomeric caulk by a homeowner. Anything larger — pattern cracks, delamination (where stucco pulls away from the wall), water-damaged areas, or chimney/window leak repairs — requires a licensed contractor. Improper DIY repair on these is the #1 cause of repeat failures because the underlying cause (usually moisture) isn't addressed. California's CSLB requires a license for any stucco work over $500. Looking for a highly-rated stucco contractor in Southern California? We are a CSLB-licensed and insured team ready to help.
How do I know if I need stucco repair vs. full re-stucco?+
If less than 30% of an elevation has visible damage, repair is the right call. If you see large areas of cracking, multiple zones of delamination, or the underlying paper and lath have rotted across an entire wall, full re-stucco of that elevation is more cost-effective long-term. Our free assessment includes a moisture survey and lath inspection so you get a defensible recommendation either way — not just a quote pushing whichever option costs more.
Do you offer warranties on stucco work?+
Yes. Stucco Champions provides a written 5-year workmanship warranty on all stucco repairs and a 10-year warranty on full re-stucco. We're a CSLB-licensed and insured contractor (license #1122006 — verifiable at cslb.ca.gov), which means our work is backed by California's contractor licensing board, not just our own promise. Request a free estimate to see the warranty terms in writing before you sign anything.
How long does a stucco repair take?+
Most patch repairs are completed in 1-2 days, including a 24-hour cure time before texture matching and color application. Full re-stucco of a single elevation runs 5-7 working days because each coat (scratch, brown, finish) needs to cure properly before the next is applied. We schedule around weather — California stucco needs daytime temperatures above 50°F with no rain forecast for at least 24 hours after each coat. Our crew shows up on time, every time.