Stucco Finish Coat Guide: Texture, Color, and Application
Written by Stucco Champions — Southern California’s Authority on Exterior Plastering.
Stucco Finish Coat Guide: Texture, Color, and Application
In a traditional Three-Coat Stucco System, the first two layers (Scratch and Brown) provide the structural foundation and leveling, but the Finish Coat provides the aesthetic personality. It is the decorative skin of your home, responsible for color retention, water shedding, and curb appeal.
Choosing the right finish involves more than just picking a color swatch. You must decide between traditional cement (highly breathable) and acrylic (highly flexible), and select a texture that complements your home's architectural style. This guide breaks down the choices, application techniques, and maintenance rules.
Free Assessment
Noticing Stucco Damage?
Get a free on-site assessment from a licensed contractor. $0 deposit, no obligation.
GET FREE ASSESSMENT1. Material Science: Cement vs. Acrylic
The most critical decision is the chemical composition of the finish coat.
Traditional Cement Finish (The "Old World" Look)
Composed of white Portland cement, hydrated lime, clean sand, and mineral pigments (conforming to **ASTM C926**).
Pros: Highly permeable (breathable), non-combustible, and low maintenance. It resists fading and can be refreshed or recolored with mineral-based Fog Coat (e.g., Omega SuperFog).
Cons: Rigid and prone to hairline cracking; colors exhibit natural "mottling" (shading variations).
Acrylic/Synthetic Finish (The "Modern" Look)
Composed of 100% acrylic polymers, quartz aggregate, and UV-resistant pigment dyes.
Pros: Elastic and flexible (bridges hairline cracks), uniform color consistency (no mottling), and holds vibrant, dark colors.
Cons: Lower vapor permeability. Requires precise waterproofing details to ensure no moisture is trapped in the wall cavity.
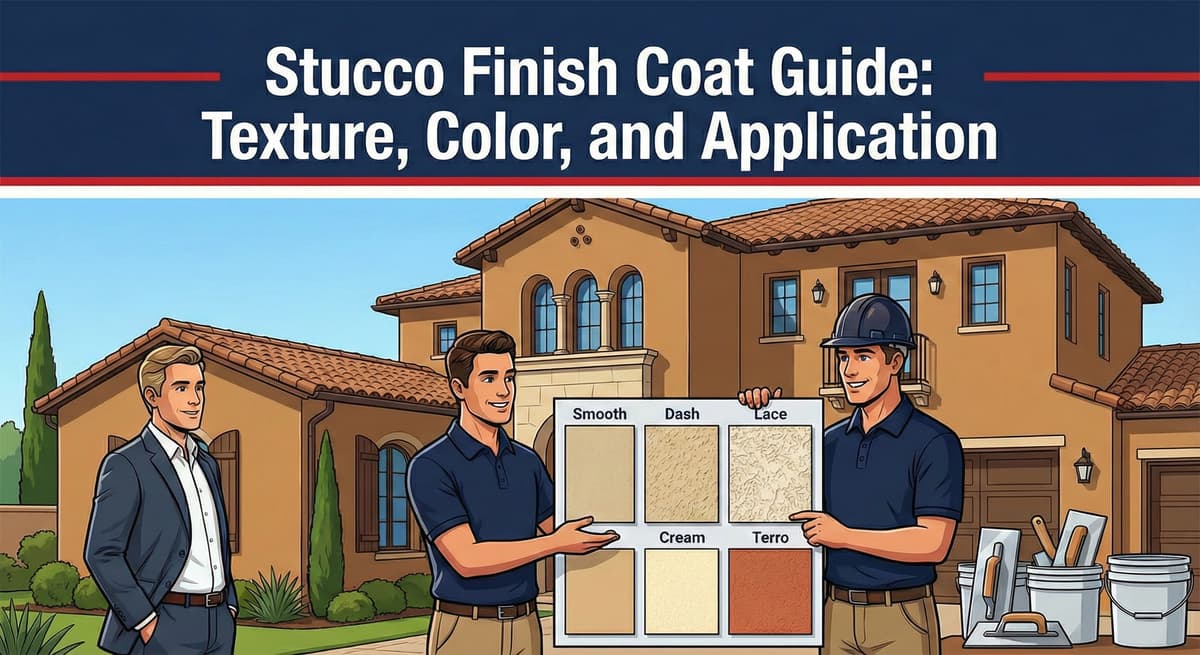
2. Texture Selection Matrix
Stucco texture dictates both the visual shadow lines and the long-term maintenance needs of the wall.
| Texture Type | Visual Profile | Architectural Fit | Maintenance Level |
|---|---|---|---|
| Smooth (Santa Barbara) | Sleek, glassy, undulating trowel marks resembling traditional adobe. | Spanish Colonial, Mediterranean, and Modern Custom Homes. | High (Highlights dirt, stains, and hairline cracks easily). |
| Sand (Float Finish) | A uniform, granular texture resembling fine sandpaper. | Modern, Craftsman, and Contemporary homes. | Low (Easy to pressure wash and clean). |
| Lace (Skip Trowel) | A knockdown texture featuring flat islands over a gritty background. | Traditional suburban tract homes; excellent for concealing patches. | Medium (Deep crevices can collect dust and dirt). |
| Dash (Knockdown) | Heavy, sprayed-on pebbled texture, sometimes lightly flattened. | Commercial buildings and multi-family complexes. | Medium (Difficult to patch seamlessly). |
The nominal thickness of the finish coat is approximately 1/8 inch. This thickness is dictated by the aggregate sand grain size (**ASTM C897** sieve mesh):
- Fine (20/30 Sieve Mesh): Used for smooth Santa Barbara smooth trowel or fine sand-float finishes.
- Coarse (16/20 Sieve Mesh): Best for skip-troweled lace or knockdown dash textures.
3. Application: The Art of the Trowel
Hand Troweled: Applied by skilled plasterers using magnesium hawks and pool trowels. Smooth, sand, and lace finishes require hand floating with a green sponge or rubber float to draw aggregate to the surface and establish the texture.
Machine Sprayed: Dash finishes are applied using a hopper gun powered by an air compressor. The plasterer sprays the mortar in multiple passes to create a uniform, textured distribution.
4. Curing and Weather Restrictions
Cement and acrylic materials cure through completely different chemical processes:
- Cement Finish: Cures by hydration. Under **ASTM C926**, it must be misted with water for at least 48 hours to slow drying and prevent shrinkage cracking. Avoid application during dry Santa Ana wind events.
- Acrylic Finish: Cures by air-drying and coalescence. It must never be misted. It requires 24 to 48 hours of dry weather and must be protected from rain and freezing temperatures until fully cured.
Never allow a contractor to dilute acrylic finish coats with water to make them spray easier. Excessive water degrades the polymer binder matrix, causing the finish to peel, blister, and fade prematurely.
Additionally, never apply an acrylic finish over a wet or "green" brown coat. Trapped moisture will cause vapor pressure, resulting in large blisters and total bond failure.
Conclusion: The Final Seal
The finish coat is your home's primary line of defense against the elements. Whether you choose the Old World charm of cement or the elastic durability of acrylic, maintaining a consistent 1/8-inch thickness and respecting the curing requirements are key to a 50-year facade.
Missed the previous steps? Read Step 2: The Brown Coat Guide to understand the leveling base coat.
A note on fog coat: Stucco Champions does not fog coat older or previously repaired walls. On aged stucco a fog coat telegraphs existing cracks, patch lines, and prior repairs, and it bonds poorly to a rough, chalky, or previously coated surface, so it can dust off or peel. Those walls get a fresh finish coat (re-stucco) instead.
Frequently Asked Questions About Stucco
How much does stucco repair cost in Orange County and Los Angeles?+
Stucco repair typically ranges from $500 for minor crack patching to $5,000+ for full re-stucco of a single elevation. The exact cost depends on the damage type (hairline cracks, water damage, delamination, weep screed failure), the square footage involved, and whether the original three-coat or one-coat stucco system needs to be matched. Stucco Champions provides fixed-price written estimates after a free on-site assessment — no hourly billing, no surprise change orders. See our stucco repair cost guide for detailed pricing by repair type.
How long does stucco last in Southern California?+
Properly installed three-coat stucco lasts 50-80+ years in Southern California's climate. The most common failure points aren't the stucco itself — they're the supporting components: corroded weep screed, deteriorated building paper behind the stucco, and improperly sealed window flashing. Most "stucco failures" are actually moisture-intrusion failures that start at one of these points. Annual visual inspection catches problems before they spread, which is why we offer free weep screed assessments for homeowners in our service area.
Can I repair stucco myself, or do I need a contractor?+
Hairline cracks under 1/8 inch wide can be sealed with elastomeric caulk by a homeowner. Anything larger — pattern cracks, delamination (where stucco pulls away from the wall), water-damaged areas, or chimney/window leak repairs — requires a licensed contractor. Improper DIY repair on these is the #1 cause of repeat failures because the underlying cause (usually moisture) isn't addressed. California's CSLB requires a license for any stucco work over $500. Looking for a highly-rated stucco contractor in Southern California? We are a CSLB-licensed and insured team ready to help.
How do I know if I need stucco repair vs. full re-stucco?+
If less than 30% of an elevation has visible damage, repair is the right call. If you see large areas of cracking, multiple zones of delamination, or the underlying paper and lath have rotted across an entire wall, full re-stucco of that elevation is more cost-effective long-term. Our free assessment includes a moisture survey and lath inspection so you get a defensible recommendation either way — not just a quote pushing whichever option costs more.
Do you offer warranties on stucco work?+
Yes. Stucco Champions provides a written 5-year workmanship warranty on all stucco repairs and a 10-year warranty on full re-stucco. We're a CSLB-licensed and insured contractor (license #1122006 — verifiable at cslb.ca.gov), which means our work is backed by California's contractor licensing board, not just our own promise. Request a free estimate to see the warranty terms in writing before you sign anything.
How long does a stucco repair take?+
Most patch repairs are completed in 1-2 days, including a 24-hour cure time before texture matching and color application. Full re-stucco of a single elevation runs 5-7 working days because each coat (scratch, brown, finish) needs to cure properly before the next is applied. We schedule around weather — California stucco needs daytime temperatures above 50°F with no rain forecast for at least 24 hours after each coat. Our crew shows up on time, every time.
Related Professional Services
A licensed assessment identifies the cause before the finish is opened or replaced.