How Long Does Stucco Take to Cure? Brown Coat Guide
Written by Stucco Champions — Southern California’s Authority on Exterior Plastering.
How Long Does Stucco Take to Cure? Brown Coat Stucco Guide
In a traditional three-coat stucco system, the Brown Coat is the workhorse. While the scratch coat provides the grip and the finish coat provides the beauty, the brown coat provides the structural flat plane. It is responsible for leveling the wall, creating a uniform surface, and absorbing the structural stress of the building.
Applying the brown coat is one of the most technically demanding phases of plastering. If this layer is wavy, uneven, or weak, the final color finish coat will fail. This guide breaks down the ASTM C926 standards for mixing, applying, and curing the second coat of stucco.
Free Assessment
Noticing Stucco Damage?
Get a free on-site assessment from a licensed contractor. $0 deposit, no obligation.
GET FREE ASSESSMENT1. The Four Essential Functions
Why do we need a second base coat? Because wood framing is never perfectly plumb or flat:
- Leveling: It straightens out the waviness of the studs and the rough texture of the scratch coat.
- Smoothing: It fills the deep grooves of the scratch coat, creating a flat plane.
- Reinforcement: It adds structural mass (another 3/8" thickness), which increases fire resistance and impact strength.
- Suction Control: It creates a uniform "spongy" density that allows the finish coat to dry evenly, preventing color shading or blotchiness.
2. The Mix and Thickness
The Brown Coat uses the same base ingredients as the scratch coat, but the sand ratio is slightly different to reduce shrinkage cracking.
1 Part Plastic Cement : 3 to 5 Parts Clean Plaster Sand (ASTM C897)
Note: We use Plastic Cement (complying with ASTM C1328) because it contains lime to improve workability and bond strength. Plaster sand must be washed and properly graded to prevent mix shrinkage and cracking.
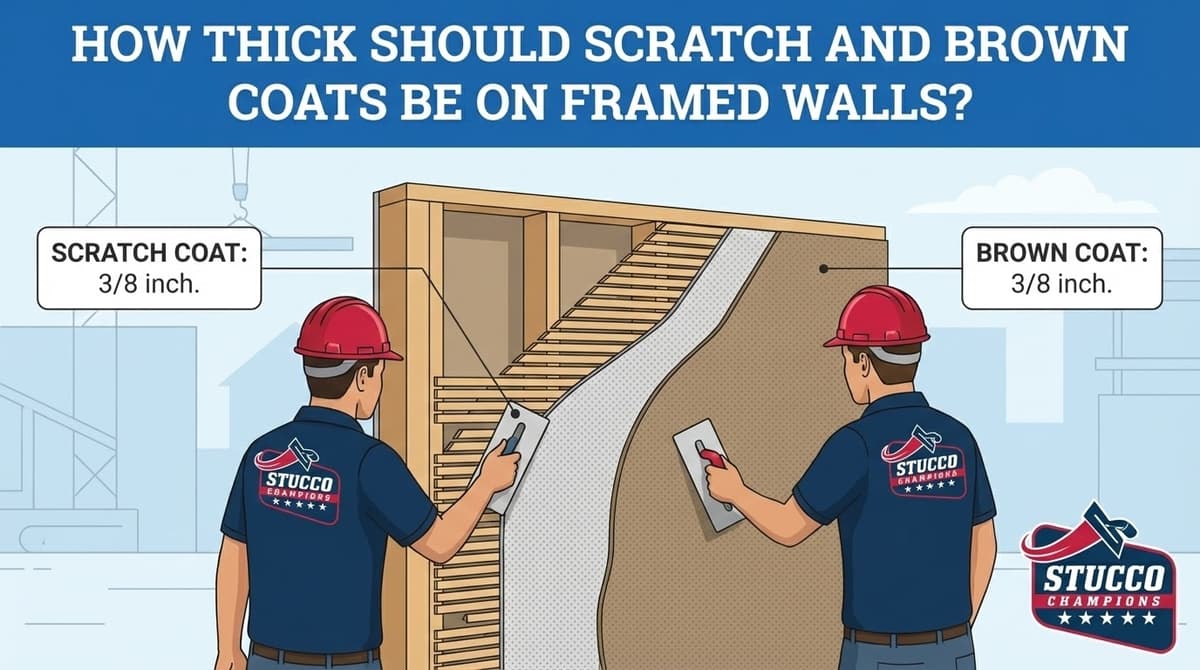
Thickness: The brown coat is applied approximately 3/8 inch thick. When combined with the scratch coat, the total base plaster thickness must be a nominal 3/4 inch over sheathing.
3. The Application Process: Rodding and Floating
This phase separates apprentices from master plasterers. It is a matter of strict geometry:
- Prep: Ensure the scratch coat is cured (minimum 48 hours) and lightly mist it with water. This prevents the scratch coat from sucking the moisture out of the new brown coat too fast.
- Application: Apply the mortar using a hawk and trowel, building up the depth.
- Rodding (Leveling): This is critical. We use a "Rod" or "Darby" (a long straightedge) to shave the wall flat, filling low spots and cutting high spots. Under ASTM C926, we maintain a planarity tolerance of less than 1/4" deviation in 10 feet.
- Floating: Once the wall is flat and the cement begins to set, we use a Green Sponge Float or Hard Rubber Float. This compacts the aggregate and brings sand to the surface, creating the "tooth" needed for the finish coat.
4. Curing Time: The 7-Day Rule
Homeowners often ask: "Why are you leaving the wall grey for so long?"
The Answer: We are waiting for the wall to crack.
Cement shrinks as it cures. We want the brown coat to do all of its shrinking and cracking before we apply the finish color coat. If we rush this step, those shrinkage cracks will telegraph through the finish coat.
- Minimum Cure: 7 Days (ASTM C926 Standard).
- Ideal Cure: 14 to 21 Days (to allow maximum shrinkage resolution).
- Hydration: In Southern California heat, the brown coat must be misted with water for the first 48 hours to ensure the cement reaches its design PSI strength.
- Rushing the Finish: Applying finish coat over an uncured, wet brown coat causes alkali/pH burn ("saponification") and paint/color delamination. Allow 7 to 14 days cure/dry.
- Leaving it Smooth: Troweling the brown coat too smooth (like glass) prevents mechanical bonding. It must be floated to create a gritty, sandpaper-like texture.
- Uneven Thickness: Variations in brown coat thickness lead to uneven drying rates in the finish coat, causing color shading or blotchiness.
Quick Answer: How Long Does Stucco Take to Cure?
How long does stucco take to cure? In a traditional three-coat stucco system, the scratch coat and brown coat each need controlled moisture curing before the next layer is applied. The brown coat is commonly allowed to cure for about 7 days before the finish coat, while the full stucco assembly continues gaining strength over a longer period.
Curing is not the same as drying. Drying only means surface moisture has left the wall. Curing is the cement hydration process that gives the plaster strength, bond, and durability. If the brown coat dries too fast in sun, wind, or heat, the wall can become weak, powdery, cracked, or uneven before the finish coat is installed.
| Stucco Stage | Typical Timing | What the Crew Is Watching |
|---|---|---|
| Scratch coat | Usually moisture-cured before brown coat | Firm key, proper scratch pattern, no dusty surface |
| Brown coat | Often about 7 days before finish coat | Flatness, hardness, moisture balance, crack control |
| Finish coat | Depends on product, weather, and finish type | Color consistency, texture uniformity, clean drying |
Why the Brown Coat Cure Matters
The brown coat is the layer that makes the wall flat. It fills and levels over the scratch coat, creates the plane for the finish coat, and helps distribute stress across the stucco assembly. If this coat is rushed, the final wall may show waves, shadow lines, shrinkage cracks, or uneven texture even if the finish material is high quality.
In Southern California, curing can be affected by direct sun, Santa Ana winds, dry inland heat, coastal humidity, shaded walls, and the time of year. A wall that looks dry from the street may still need controlled curing before it is ready for finish. That is why experienced plasterers look at wall hardness, surface condition, moisture behavior, and weather exposure instead of relying on the calendar alone.
What Can Make Stucco Cure Too Fast or Too Slowly?
Several site conditions can change the answer to how long does stucco take to cure. Hot weather, wind, dark wall exposure, absorbent substrates, and thin application can pull water out too quickly. Cool weather, shaded elevations, damp conditions, or poor ventilation can slow drying and delay finish work.
- Too fast: rapid water loss can cause shrinkage cracks, weak bond, dusty surfaces, and poor finish performance.
- Too slow: trapped moisture or cold damp conditions can delay finish coat scheduling and affect color uniformity.
- Uneven curing: one wall elevation may cure differently from another because of sun, shade, sprinklers, or wind exposure.
- Skipped curing: applying the finish too soon can lock in a weak base coat and make defects harder to correct later.
When Is the Brown Coat Ready for Finish?
A brown coat is ready for finish when it is firm, properly cured, flat enough for the selected texture, and free of loose sand, major cracks, or active moisture problems. Smooth finishes and fine textures require more wall preparation than heavy textures because they reveal surface waves and patch lines more easily.
If the wall has visible cracking, soft spots, or moisture staining during the cure window, the right move is to diagnose the base coat before moving forward. For repair work, see our stucco repair service. If a patch needs to blend into an existing wall, review stucco patching and texture matching. For system differences, our one-coat vs. three-coat stucco guide explains why cure timing changes by assembly.
Brown Coat Cure Warning Signs
A curing brown coat should become firm and uniform, not dusty, sandy, or brittle. Warning signs include surface powdering, rapid shrinkage cracks, dark damp patches that do not dry evenly, loose corners, or walls that feel soft when lightly tapped. Those issues should be corrected before the finish coat because the finish layer is thin and will not hide structural problems in the base.
For homeowners, the practical answer to how long does stucco take to cure is this: do not judge only by color. A brown coat can look dry while still needing moisture control, and it can look darker in shaded areas without being defective. The contractor should evaluate the wall by cure time, weather exposure, hardness, flatness, and whether the surface is ready to accept the finish texture.
Can Stucco Cure in Hot Weather?
Stucco can cure in warm weather when the crew protects the wall from rapid water loss. That may mean misting, shade timing, adjusting work sequence by elevation, and avoiding finish work during the harshest heat or wind. The goal is not to keep the wall wet forever. The goal is to keep cement plaster from losing moisture so quickly that it cannot gain proper strength.
Conclusion: The Structural Core
The brown coat is the backbone of your exterior. It flattens the walls and provides the stable base required for a flawless finish. By respecting the mix ratios and the 7-day cure time, Stucco Champions ensures the structural integrity of your home.
Missed the first step? Read Step 1: The Scratch Coat Guide.
Ready for the final layer? Check out our Step 3: The Finish Coat Guide to choose your texture and color.
Frequently Asked Questions About Stucco
How much does stucco repair cost in Orange County and Los Angeles?+
Stucco repair typically ranges from $500 for minor crack patching to $5,000+ for full re-stucco of a single elevation. The exact cost depends on the damage type (hairline cracks, water damage, delamination, weep screed failure), the square footage involved, and whether the original three-coat or one-coat stucco system needs to be matched. Stucco Champions provides fixed-price written estimates after a free on-site assessment — no hourly billing, no surprise change orders. See our stucco repair cost guide for detailed pricing by repair type.
How long does stucco last in Southern California?+
Properly installed three-coat stucco lasts 50-80+ years in Southern California's climate. The most common failure points aren't the stucco itself — they're the supporting components: corroded weep screed, deteriorated building paper behind the stucco, and improperly sealed window flashing. Most "stucco failures" are actually moisture-intrusion failures that start at one of these points. Annual visual inspection catches problems before they spread, which is why we offer free weep screed assessments for homeowners in our service area.
Can I repair stucco myself, or do I need a contractor?+
Hairline cracks under 1/8 inch wide can be sealed with elastomeric caulk by a homeowner. Anything larger — pattern cracks, delamination (where stucco pulls away from the wall), water-damaged areas, or chimney/window leak repairs — requires a licensed contractor. Improper DIY repair on these is the #1 cause of repeat failures because the underlying cause (usually moisture) isn't addressed. California's CSLB requires a license for any stucco work over $500. Looking for a highly-rated stucco contractor in Southern California? We are a CSLB-licensed and insured team ready to help.
How do I know if I need stucco repair vs. full re-stucco?+
If less than 30% of an elevation has visible damage, repair is the right call. If you see large areas of cracking, multiple zones of delamination, or the underlying paper and lath have rotted across an entire wall, full re-stucco of that elevation is more cost-effective long-term. Our free assessment includes a moisture survey and lath inspection so you get a defensible recommendation either way — not just a quote pushing whichever option costs more.
Do you offer warranties on stucco work?+
Approved stucco repair work includes a 1-year written workmanship warranty. The applicable terms are documented with the approved scope. Stucco Champions is CSLB licensed and insured; verify license #1122006 through the official state lookup. Request a free estimate to review the scope and warranty terms before you sign.
How long does a stucco repair take?+
Most patch repairs are completed in 1-2 days, including a 24-hour cure time before texture matching and color application. Full re-stucco of a single elevation runs 5-7 working days because each coat (scratch, brown, finish) needs to cure properly before the next is applied. We schedule around weather — California stucco needs daytime temperatures above 50°F with no rain forecast for at least 24 hours after each coat. Our crew shows up on time, every time.
Related Professional Services
A licensed assessment identifies the cause before the finish is opened or replaced.