Stucco for Pizza Ovens: High-Heat Base Coat Recipe
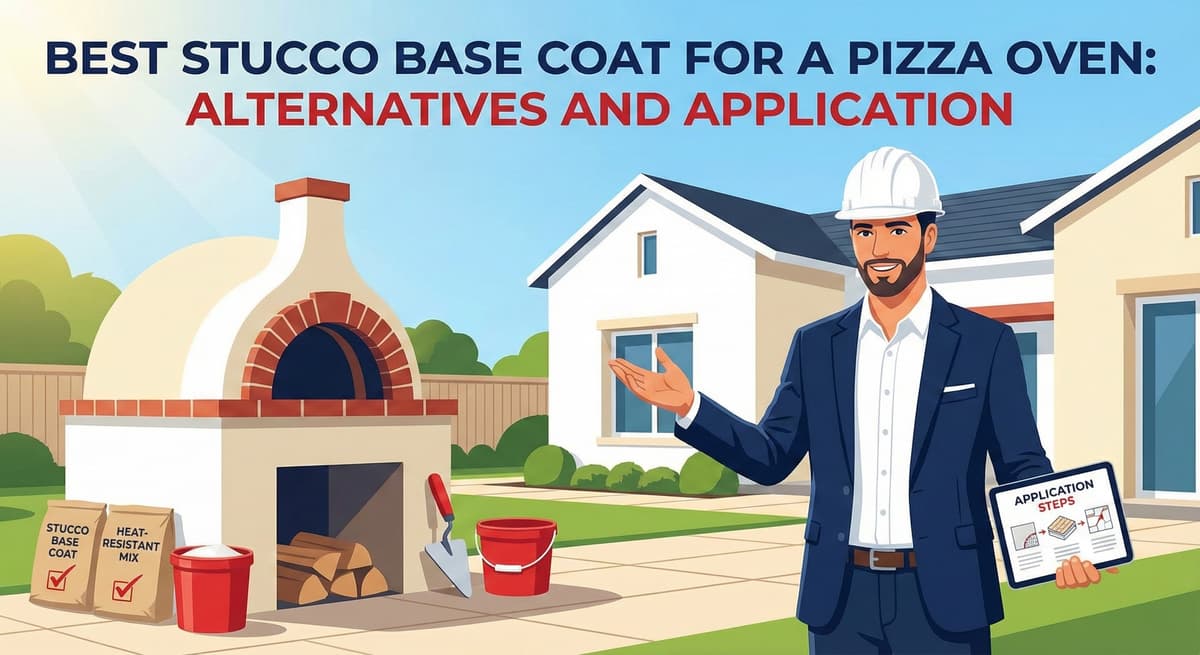
Building a backyard pizza oven is a rite of passage for many Southern California homeowners. While much attention is paid to the refractory firebricks inside the dome, the exterior stucco shell often becomes an afterthought.
Applying the wrong stucco base coat to a masonry structure that violently cycles between 60°F and 800°F is a recipe for disaster. If your local supply yard is out of specific pre-bagged pizza oven mixes, do not just grab a bag of standard concrete from a big-box store. This guide explains the chemistry required for a durable, heat-resistant exterior shell and how to mix your own base coat from scratch.
1. The Physics: Why Standard Concrete Fails
Many DIYers assume they can mix standard Portland cement with sand and trowel it over the dome. This usually fails spectacularly for two reasons:
- Lack of Plasticity: Pure Portland cement is extremely rigid and brittle. When the pizza oven expands from intense heat, the rigid cement shell cracks instantly.
- Flash Drying: Without lime or chemical plasticizers, standard concrete loses its water too fast, making it nearly impossible to trowel smoothly over a curved dome surface.
The Goal: You need a mix that is "plastic" (workable and highly flexible) but also breathable.
Free Assessment
Noticing Stucco Damage?
Get a free on-site assessment from a licensed contractor. $0 deposit, no obligation.
GET FREE ASSESSMENT2. The Professional Recipe: Plastic Cement
If you cannot find a pre-bagged stucco base coat (like Sakrete or Quikrete Base Coat), the professional alternative is to mix your own using Plastic Cement.
- 1 Part Plastic Cement (ASTM C1328). This specific cement contains Portland cement plus lime and plasticizers.
- 3 to 4 Parts Masonry Sand (Washed Plaster Sand).
- Water: Add clean water slowly until a "stiff peanut butter" consistency is reached.
Why this works: The high lime content in Plastic Cement allows the stucco to flex slightly with the extreme thermal expansion of the oven, drastically reducing the risk of spiderweb cracking.
3. The "Thermal Break" Requirement (Critical)
Crucial Warning: Stucco is not a refractory material. It absolutely cannot touch the fire or the interior heat source.
The exterior stucco shell is strictly decorative and weather-proofing. Between the internal firebrick dome and the external stucco shell, you must have a thick insulation layer (usually a ceramic fiber blanket or vermiculite/perlite concrete).
If the exterior of your oven gets hot enough to burn your hand, the stucco will crack, regardless of what mix you use. The insulation keeps the 900-degree heat inside the oven and the stucco shell cool.
4. Application Protocol: The Wire Skeleton
Unlike a flat vertical wall, a pizza oven is a dome. Gravity is working directly against you.
- Lathing: Tightly wrap the insulation layer in 17-gauge or 20-gauge galvanized woven wire (chicken wire). This acts as the skeleton. Without it, the heavy wet stucco will slide right off the dome.
- The Scratch Coat: Apply the Plastic Cement mix roughly 1/2 inch thick, forcefully pushing it through the wire mesh to encapsulate the metal. Scratch horizontal grooves into it while wet.
- The Cure: Cover the dome with a tarp and mist it with water for 3 to 5 days. This slow hydration process is critical for cement strength.
5. Bagged Alternatives
If you prefer pre-mixed bags over shoveling bulk sand, look for these specific products:
- Quikrete Fiberglass Reinforced Stucco: The added fiberglass strands provide excellent tensile strength against thermal movement.
- Rapid Set Stucco Patch: Good for minor repairs, but it sets extremely fast (20 minutes). Only use for small areas.
- Avoid: Do not use Gypsum-based interior plasters (like Structo-Lite) for outdoor ovens. Gypsum dissolves completely in the rain. Stick strictly to Portland-based products.
Conclusion: Build the Shell Correctly
Your pizza oven should be a backyard centerpiece, not a constant maintenance headache. By using Plastic Cement or a fiber-reinforced base coat over a proper insulation layer, you ensure the exterior remains beautiful and crack-free while the inside bakes at 900 degrees.
Frequently Asked Questions About Stucco
How much does stucco repair cost in Orange County and Los Angeles?+
Stucco repair typically ranges from $500 for minor crack patching to $5,000+ for full re-stucco of a single elevation. The exact cost depends on the damage type (hairline cracks, water damage, delamination, weep screed failure), the square footage involved, and whether the original three-coat or one-coat stucco system needs to be matched. Stucco Champions provides fixed-price written estimates after a free on-site assessment — no hourly billing, no surprise change orders. See our stucco repair cost guide for detailed pricing by repair type.
How long does stucco last in Southern California?+
Properly installed three-coat stucco lasts 50-80+ years in Southern California's climate. The most common failure points aren't the stucco itself — they're the supporting components: corroded weep screed, deteriorated building paper behind the stucco, and improperly sealed window flashing. Most "stucco failures" are actually moisture-intrusion failures that start at one of these points. Annual visual inspection catches problems before they spread, which is why we offer free weep screed assessments for homeowners in our service area.
Can I repair stucco myself, or do I need a contractor?+
Hairline cracks under 1/8 inch wide can be sealed with elastomeric caulk by a homeowner. Anything larger — pattern cracks, delamination (where stucco pulls away from the wall), water-damaged areas, or chimney/window leak repairs — requires a licensed contractor. Improper DIY repair on these is the #1 cause of repeat failures because the underlying cause (usually moisture) isn't addressed. California's CSLB requires a license for any stucco work over $500. Looking for a highly-rated stucco contractor in Southern California? We are a CSLB-licensed and insured team ready to help.
How do I know if I need stucco repair vs. full re-stucco?+
If less than 30% of an elevation has visible damage, repair is the right call. If you see large areas of cracking, multiple zones of delamination, or the underlying paper and lath have rotted across an entire wall, full re-stucco of that elevation is more cost-effective long-term. Our free assessment includes a moisture survey and lath inspection so you get a defensible recommendation either way — not just a quote pushing whichever option costs more.
Do you offer warranties on stucco work?+
Yes. Stucco Champions provides a written 5-year workmanship warranty on all stucco repairs and a 10-year warranty on full re-stucco. We're a CSLB-licensed and insured contractor (license #1122006 — verifiable at cslb.ca.gov), which means our work is backed by California's contractor licensing board, not just our own promise. Request a free estimate to see the warranty terms in writing before you sign anything.
How long does a stucco repair take?+
Most patch repairs are completed in 1-2 days, including a 24-hour cure time before texture matching and color application. Full re-stucco of a single elevation runs 5-7 working days because each coat (scratch, brown, finish) needs to cure properly before the next is applied. We schedule around weather — California stucco needs daytime temperatures above 50°F with no rain forecast for at least 24 hours after each coat. Our crew shows up on time, every time.
Related Professional Services
A licensed assessment identifies the cause before the finish is opened or replaced.