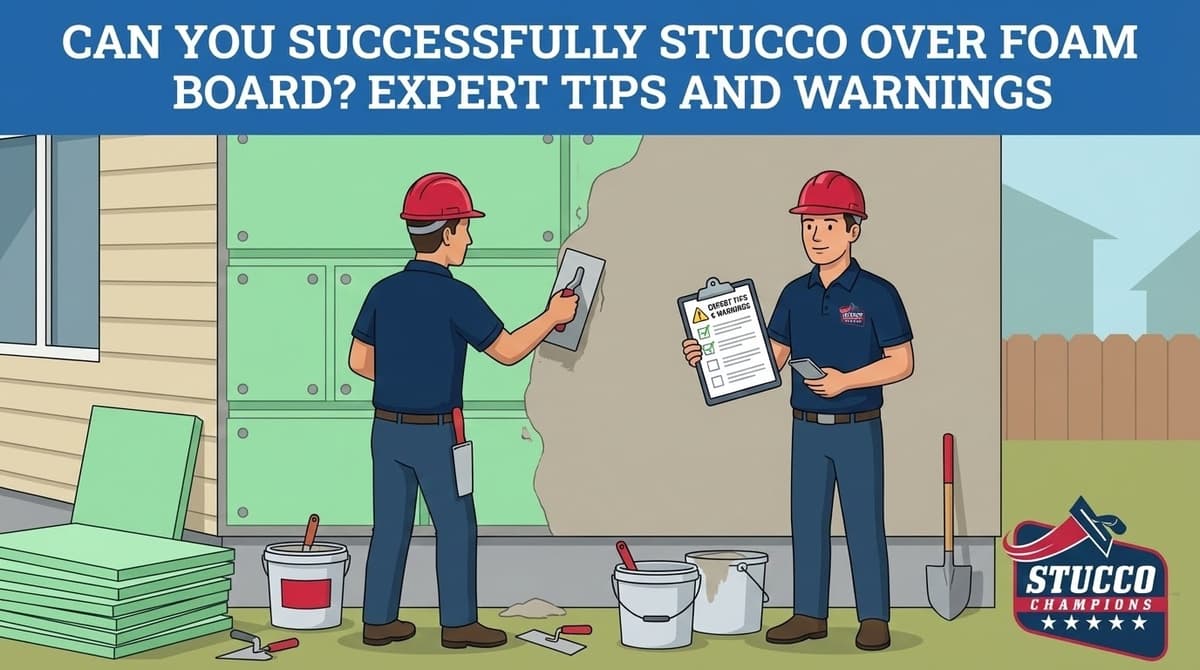
Can You Stucco Over Foam Board? EIFS Rules and Warnings
If you are trying to fill a decorative gap around a window, create a custom architectural "pop-out," or insulate a home addition, you might be wondering: "Can I just glue foam boards to the wall and trowel cement stucco directly over them?"
The answer is Yes, but only if you treat it as an engineered EIFS (Exterior Insulation and Finish System). Foam insulation boards are soft and flexible, whereas traditional stucco plaster is hard and brittle. If you do not use the correct alkali-resistant mesh reinforcement and polymer-modified base coat, the heavy stucco will crack and delaminate from the foam within months. This guide explains the professional method for integrating foam details into your exterior wall system.
1. Material Selection: Not All Foam is Equal
Do not use standard extruded insulation boards (XPS/Pink Board) intended for below-grade foundation use. Plaster requires a specific density and open-cell surface type to bond correctly.
- Use EPS (Expanded Polystyrene): This is the white, beaded foam board complying with ASTM C578 specifications. It is vapor permeable and provides the optimal surface for cementitious and acrylic adhesive bonds.
- Density: We specify a minimum of 1.0 lb/cu ft or 1.5 lb/cu ft density. Foam that is too soft will dent under impact; foam that is too dense is difficult to rasp flat and level.
Free Assessment
Noticing Stucco Damage?
Get a free on-site assessment from a licensed contractor. $0 deposit, no obligation.
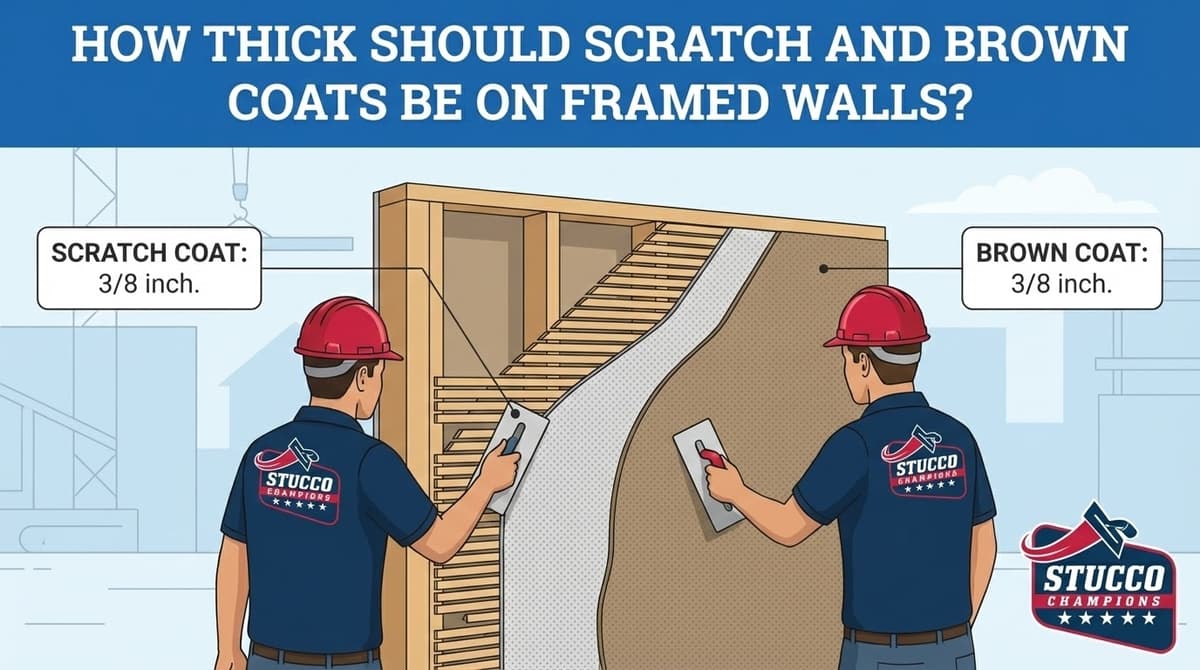
GET FREE ASSESSMENT2. The "Base Coat & Mesh" System
You absolutely cannot apply color finish stucco directly over raw foam. You must create an armored, crack-resistant cement shell first.
Step A: Rasping
Foam joints are rarely perfectly flat. We use a heavy-duty rasp (a massive sanding board) to level all joints and scuff the surface. This removes UV degradation and opens the cell pores of the EPS beads for maximum mechanical bond.
Step B: Base Coat
Apply a layer of polymer-modified cement base coat (designed specifically for EIFS/foam applications) directly to the face of the board. Standard scratch coat plastic cement is far too rigid and lacks the necessary chemical polymers to stick to plastic foam.
Step C: Mesh Embedment
While the base coat is wet, embed a layer of alkali-resistant fiberglass mesh. The mesh must be fully encapsulated in the cement (not sitting dry against the foam). This mesh acts as the tensile skeleton that prevents cracking.
If the foam detail is installed near the ground, walkways, or doorways (high-traffic zones), standard 4.5 oz fiberglass mesh is totally inadequate. You must upgrade to High-Impact Mesh (15 oz to 20 oz) to prevent punctures and dents from lawnmowers, keys, or impacts. This must comply with ASTM C1397 continuous insulation standards.
3. The Finish Coat
Once the reinforced base coat has cured (minimum 24 hours), the color finish can be applied.
- Acrylic/Synthetic Finish: Highly recommended over foam. Acrylic finishes are flexible elastomeric polymers. They stretch over hairline movement and hold vibrant pigments beautifully without fading.
- Traditional Cement Finish: High risk of cracking over foam due to its inherent rigidity, though permissible if applied over a thick, heavily reinforced base.
4. Common Failure Points
Why do foam pop-outs fail and fall off walls?
- Lack of Back-Wrapping: The fiberglass mesh must wrap entirely around all cut edges of the foam board and terminate onto the substrate. Leaving foam edges exposed to the weather allows moisture to get behind the system, causing total delamination.
- Inadequate Drainage Slope: Horizontal foam details (such as massive window sills or decorative bands) must have a minimum slope of 6:12 (or 27 degrees) to shed bulk water. Flat surfaces collect standing water, which eventually degrades the acrylic coating and rots the wall.
Stucco Over Foam Problems to Watch For
The biggest stucco over foam problems usually happen when foam is treated like a simple backing board instead of part of a tested wall system. The Stucco Manufacturers Association notes that one-coat systems over rigid foam are proprietary assemblies that should follow the manufacturer's evaluation report and installation instructions.
- Wrong foam: foam that is not approved by the system manufacturer can move, dent, or fail to bond.
- No drainage plan: wet-climate assemblies may need vertical drainage channels, drainage mat, or other manufacturer-approved drainage details.
- WRB in the wrong place: guidance for one-coat over rigid foam commonly places the water-resistive barrier under the foam, with laps integrated shingle-fashion with flashing.
- Rigid cement over flexible foam: standard cement plaster without the right base coat and mesh can crack quickly.
- Blocked terminations: foam bands and lower wall details should not cover drainage outlets such as a weep screed.
If the foam detail is near a window, door, or parapet, the drainage and flashing details matter as much as the finish texture. Surface sealant alone will not correct a failed foam-backed stucco assembly; it may require targeted stucco repair or moisture evaluation.
Conclusion: Stick to the System
Stuccoing over foam is an excellent way to achieve massive architectural detail without adding structural weight, but it requires specific polymer chemistry. Always follow EIFS and Direct-Applied system guidelines to ensure the system sheds water and stays anchored to your home's framing.
Frequently Asked Questions About Stucco
How much does stucco repair cost in Orange County and Los Angeles?+
Stucco repair typically ranges from $500 for minor crack patching to $5,000+ for full re-stucco of a single elevation. The exact cost depends on the damage type (hairline cracks, water damage, delamination, weep screed failure), the square footage involved, and whether the original three-coat or one-coat stucco system needs to be matched. Stucco Champions provides fixed-price written estimates after a free on-site assessment — no hourly billing, no surprise change orders. See our stucco repair cost guide for detailed pricing by repair type.
How long does stucco last in Southern California?+
Properly installed three-coat stucco lasts 50-80+ years in Southern California's climate. The most common failure points aren't the stucco itself — they're the supporting components: corroded weep screed, deteriorated building paper behind the stucco, and improperly sealed window flashing. Most "stucco failures" are actually moisture-intrusion failures that start at one of these points. Annual visual inspection catches problems before they spread, which is why we offer free weep screed assessments for homeowners in our service area.
Can I repair stucco myself, or do I need a contractor?+
Hairline cracks under 1/8 inch wide can be sealed with elastomeric caulk by a homeowner. Anything larger — pattern cracks, delamination (where stucco pulls away from the wall), water-damaged areas, or chimney/window leak repairs — requires a licensed contractor. Improper DIY repair on these is the #1 cause of repeat failures because the underlying cause (usually moisture) isn't addressed. California's CSLB requires a license for any stucco work over $500. Looking for a highly-rated stucco contractor in Southern California? We are a CSLB-licensed and insured team ready to help.
How do I know if I need stucco repair vs. full re-stucco?+
If less than 30% of an elevation has visible damage, repair is the right call. If you see large areas of cracking, multiple zones of delamination, or the underlying paper and lath have rotted across an entire wall, full re-stucco of that elevation is more cost-effective long-term. Our free assessment includes a moisture survey and lath inspection so you get a defensible recommendation either way — not just a quote pushing whichever option costs more.
Do you offer warranties on stucco work?+
Yes. Stucco Champions provides a written 5-year workmanship warranty on all stucco repairs and a 10-year warranty on full re-stucco. We're a CSLB-licensed and insured contractor (license #1122006 — verifiable at cslb.ca.gov), which means our work is backed by California's contractor licensing board, not just our own promise. Request a free estimate to see the warranty terms in writing before you sign anything.
How long does a stucco repair take?+
Most patch repairs are completed in 1-2 days, including a 24-hour cure time before texture matching and color application. Full re-stucco of a single elevation runs 5-7 working days because each coat (scratch, brown, finish) needs to cure properly before the next is applied. We schedule around weather — California stucco needs daytime temperatures above 50°F with no rain forecast for at least 24 hours after each coat. Our crew shows up on time, every time.
Related Professional Services
A licensed assessment identifies the cause before the finish is opened or replaced.