How to Stucco a Cinder Block Wall (Direct-Apply Method)
In Southern California construction, cinder block (CMU - Concrete Masonry Unit) is the absolute standard for heavy retaining walls, detached garages, and perimeter property fencing. Because CMU block is already a rigid masonry product, it makes a structurally ideal substrate for cement plaster. If you want to know how to stucco a cinder block wall, the good news is that the process is significantly faster than stuccoing over wood framing.
Unlike flexible wood framing—which legally requires building paper and wire lath to manage structural movement—you can chemically bond cement directly to the masonry. However, learning how to stucco a cinder block wall requires mastering adhesion and moisture management. If the block is sealed, painted, or bone dry, the new finish will simply delaminate (sheet off). This guide outlines the professional Direct-Apply Method.
1. The Diagnostic Step: Checking Block Porosity
Before you buy a single bag of cement, you absolutely must determine if the surface is capable of accepting a chemical bond. This is the first and most critical rule of how to stucco a cinder block wall.
Splash a cup of clean water against the masonry.
- Result A (Water darkens and absorbs instantly): Verdict: Ready. The block is porous, thirsty, and ready to bond.
- Result B (Water beads up or runs straight off): Verdict: Sealed. The block cannot accept a direct application.
You absolutely cannot apply wet cement directly to painted masonry. The chemical bond will fail immediately. If you are researching how to stucco a cinder block wall that is currently painted, you must either aggressively sandblast the paint completely off to expose the raw aggregate, or mechanically attach heavy metal wire lath over the paint with masonry pins to give the mud something to physically grip.
Free Assessment
Noticing Stucco Damage?
Get a free on-site assessment from a licensed contractor. $0 deposit, no obligation.
GET FREE ASSESSMENT2. Surface Preparation
Learning how to stucco a cinder block wall means accepting that cement will not stick to dirt, dust, moss, or efflorescence (white chalky salts).
Pressure Wash: Use a minimum of 2,500 PSI to blast the concrete pores completely clean. If black mold or algae is present, treat the masonry with a bleach/water solution first. Allow the masonry to dry until it is damp but not dripping wet (the Saturated Surface Dry condition).
3. The "Glue": Using Liquid Bonding Agents
While old-school masons relied on water alone, modern architectural standards dictate the mandatory use of a Liquid Bonding Agent (like Weld-Crete or Quikrete Bonding Adhesive) for direct-apply applications.
Application: Vigorously roll or brush the blue/green adhesive liquid directly onto the clean block.
Note: Read the manufacturer's label carefully. A key part of how to stucco a cinder block wall successfully is knowing whether your specific bonding agent requires the wet cement to be applied while the glue is still wet, or if it must dry to a tacky, flexible film first (like Weld-Crete).
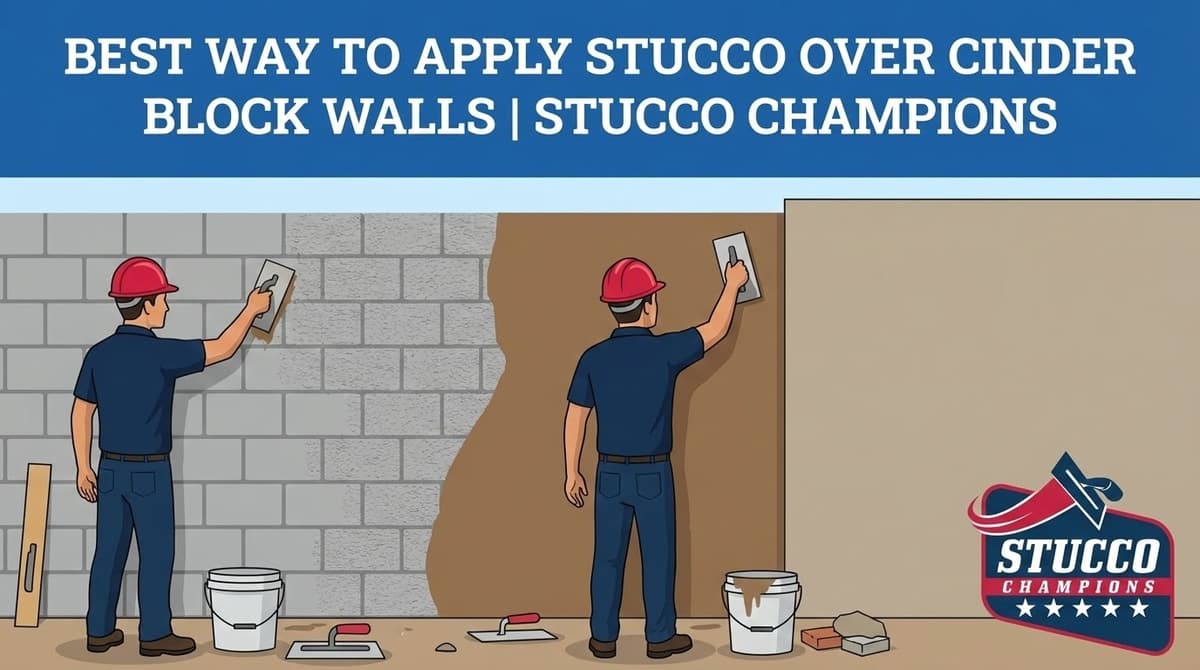
4. The Two-Coat Application Protocol
For solid masonry, we skip the traditional "three-coat" (scratch, brown, finish) wire lath system used on wood houses. The proper method for how to stucco a cinder block wall is a heavier two-coat direct-apply process.
Step A: The Base Coat (Leveling)
Material: We highly recommend using a Fiber-Reinforced Stucco base. The fiberglass strands prevent the mortar joints between the individual bricks from "telegraphing" (showing grid cracks right through the final finish).
Thickness: Apply the base coat heavily, approximately 3/8" to 1/2" thick (resulting in a total nominal thickness of 5/8" per ASTM C926 when eventually combined with the 1/8" finish coat).
Technique: Push hard with the trowel. You need to physically force the heavy material deep into the pores of the masonry to ensure a solid mechanical key.
Step B: The Cure (Mandatory)
Hydration is Mandatory. Cinder block walls are massive sponges; they will aggressively suck the hydration water right out of your wet cement. If it dries too fast, it "flash cures" and cracks severely.
You must mist the new base coat heavily with a garden hose twice a day for a minimum of 48 hours. This slow cure allows the chemical bond to properly lock in.
Step C: The Finish Coat
Once the heavy base is fully cured and hydrated, apply your 1/8" color finish coat. Whether you choose a highly polished, smooth Santa Barbara finish or a rough, heavily textured Sand finish, the perfectly flat base coat provides the ideal canvas.
Conclusion
Understanding how to stucco a cinder block wall properly results in one of the most durable, bulletproof exterior finishes possible—provided you respect the chemistry of adhesion. Clean the masonry aggressively, use a high-quality bonding agent, and keep it wet during the cure. Do this, and your industrial retaining wall will look like a custom Mediterranean estate.
Frequently Asked Questions About Stucco
How much does stucco repair cost in Orange County and Los Angeles?+
Stucco repair typically ranges from $500 for minor crack patching to $5,000+ for full re-stucco of a single elevation. The exact cost depends on the damage type (hairline cracks, water damage, delamination, weep screed failure), the square footage involved, and whether the original three-coat or one-coat stucco system needs to be matched. Stucco Champions provides fixed-price written estimates after a free on-site assessment — no hourly billing, no surprise change orders. See our stucco repair cost guide for detailed pricing by repair type.
How long does stucco last in Southern California?+
Properly installed three-coat stucco lasts 50-80+ years in Southern California's climate. The most common failure points aren't the stucco itself — they're the supporting components: corroded weep screed, deteriorated building paper behind the stucco, and improperly sealed window flashing. Most "stucco failures" are actually moisture-intrusion failures that start at one of these points. Annual visual inspection catches problems before they spread, which is why we offer free weep screed assessments for homeowners in our service area.
Can I repair stucco myself, or do I need a contractor?+
Hairline cracks under 1/8 inch wide can be sealed with elastomeric caulk by a homeowner. Anything larger — pattern cracks, delamination (where stucco pulls away from the wall), water-damaged areas, or chimney/window leak repairs — requires a licensed contractor. Improper DIY repair on these is the #1 cause of repeat failures because the underlying cause (usually moisture) isn't addressed. California's CSLB requires a license for any stucco work over $500. Looking for a highly-rated stucco contractor in Southern California? We are a CSLB-licensed and insured team ready to help.
How do I know if I need stucco repair vs. full re-stucco?+
If less than 30% of an elevation has visible damage, repair is the right call. If you see large areas of cracking, multiple zones of delamination, or the underlying paper and lath have rotted across an entire wall, full re-stucco of that elevation is more cost-effective long-term. Our free assessment includes a moisture survey and lath inspection so you get a defensible recommendation either way — not just a quote pushing whichever option costs more.
Do you offer warranties on stucco work?+
Yes. Stucco Champions provides a written 5-year workmanship warranty on all stucco repairs and a 10-year warranty on full re-stucco. We're a CSLB-licensed and insured contractor (license #1122006 — verifiable at cslb.ca.gov), which means our work is backed by California's contractor licensing board, not just our own promise. Request a free estimate to see the warranty terms in writing before you sign anything.
How long does a stucco repair take?+
Most patch repairs are completed in 1-2 days, including a 24-hour cure time before texture matching and color application. Full re-stucco of a single elevation runs 5-7 working days because each coat (scratch, brown, finish) needs to cure properly before the next is applied. We schedule around weather — California stucco needs daytime temperatures above 50°F with no rain forecast for at least 24 hours after each coat. Our crew shows up on time, every time.