Proper Stucco Application: What Professional Contractors Always Get Right
Written by Stucco Champions — Southern California’s Authority on Exterior Plastering.
In the construction industry, there is a saying: "Stucco doesn't fail; the application fails." Stucco is a robust, 50-year cladding system. Yet, we constantly see cracking, delamination, and water intrusion on homes that are less than a decade old. Why?
Because the contractor skipped the science. Proper stucco application is a strict sequence of waterproofing, lathing reinforcement, and cement curing dictated by ASTM C926 and ASTM C1063. This guide breaks down the non-negotiable steps we take to ensure your exterior survives the Southern California climate.
1. Surface Prep: The Foundation of Adhesion
You cannot apply stucco to a compromised surface. Before we mix a single batch of mud, the substrate must be perfect.
- Clean Substrate: If we are stuccoing over masonry, we pressure wash to remove bond breakers like oil or dust.
- Two-Layer Waterproofing (CRC Section R703.7.3): We strictly adhere to the California code requirement for two layers of Grade D Building Paper (or ASTM D226 asphalt-saturated felt). This creates a "drainage plane" that separates the wet stucco from your wood sheathing.
- Flashing Integration (ASTM E2112 / AAMA 2400): We verify that window fins and Z-bars are "shingled" correctly with the paper. Water must always run over the lap, never behind it.
Free Assessment
Noticing Stucco Damage?
Get a free on-site assessment from a licensed contractor. $0 deposit, no obligation.
GET FREE ASSESSMENT2. Lath and Drainage: The Steel Skeleton
Stucco is heavy (10-12 lbs per sq. ft.). The lath holds it up.
- Galvanized Mesh: We use self-furred wire lath that holds itself 1/4 inch off the sheathing, allowing cement to fully encapsulate the steel.
- Weep Screed: This is mandatory. We install the metal screed at least 4 inches above the raw soil/earth and 2 inches above paved concrete to prevent moisture wicking and allow the wall cavity to drain.
- Fastening: We space staples every 6 inches vertically into the studs to ensure seismic shear strength.
3. The Three-Coat System Protocol
We do not cut corners with "double-back" methods unless specified. We believe in the traditional cure times under ASTM C926.
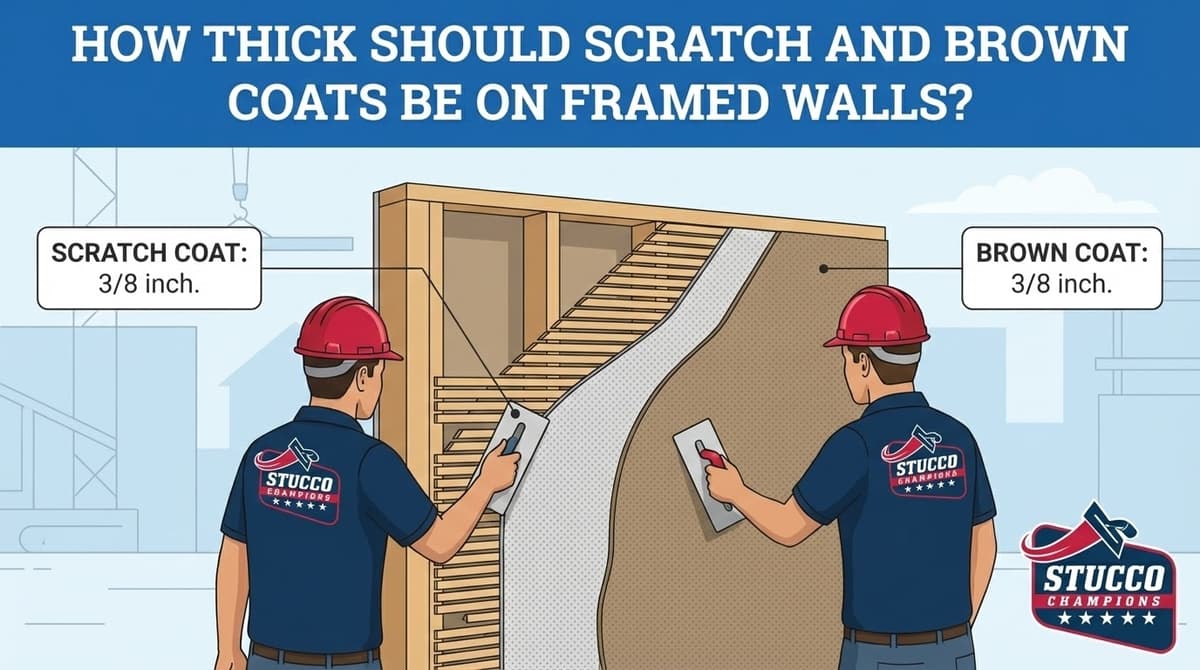
Step A: The Scratch Coat
The bond layer. We apply it tight to the wire (minimum 3/8" thickness) and score it horizontally. This roughness gives the brown coat something to grip. We mist it for 48 hours.
Step B: The Brown Coat
The structural leveling layer. We build the wall out to a total thickness of 3/4" and "rod" it flat. We let this layer cure for a minimum of 7 to 14 days to allow shrinkage cracks to occur before the finish is applied.
Step C: The Finish Coat
The aesthetic layer. Whether you choose a modern Smooth Finish or a traditional Lace, we apply it at a consistent 1/8" thickness to ensure color uniformity and achieve the nominal 7/8" total system thickness required for the **ASTM E119 1-hour fire rating**.
4. Managing the Environment: Weather Protocols
Stucco cures by hydration. If it dries too fast (such as during dry Santa Ana winds) or freezes, the chemical bond fails.
We mist the walls with water for 48 hours after the base coats are applied. This slows down the drying process, making the cement harder and significantly reducing "spiderweb" crazing cracking.
Conclusion: Quality is a Process
A flawless stucco job isn't just about looking good on day one; it's about looking good on day 5,000. By respecting the cure times, using the right mix ratios, and obsessing over the waterproofing details, Stucco Champions delivers an exterior that protects your asset.
Related Resources
Last week, we shared What Is a Three-Coat Stucco System? Dive deeper into the layers of the wall.
Frequently Asked Questions About Stucco
How much does stucco repair cost in Orange County and Los Angeles?+
Stucco repair typically ranges from $500 for minor crack patching to $5,000+ for full re-stucco of a single elevation. The exact cost depends on the damage type (hairline cracks, water damage, delamination, weep screed failure), the square footage involved, and whether the original three-coat or one-coat stucco system needs to be matched. Stucco Champions provides fixed-price written estimates after a free on-site assessment — no hourly billing, no surprise change orders. See our stucco repair cost guide for detailed pricing by repair type.
How long does stucco last in Southern California?+
Properly installed three-coat stucco lasts 50-80+ years in Southern California's climate. The most common failure points aren't the stucco itself — they're the supporting components: corroded weep screed, deteriorated building paper behind the stucco, and improperly sealed window flashing. Most "stucco failures" are actually moisture-intrusion failures that start at one of these points. Annual visual inspection catches problems before they spread, which is why we offer free weep screed assessments for homeowners in our service area.
Can I repair stucco myself, or do I need a contractor?+
Hairline cracks under 1/8 inch wide can be sealed with elastomeric caulk by a homeowner. Anything larger — pattern cracks, delamination (where stucco pulls away from the wall), water-damaged areas, or chimney/window leak repairs — requires a licensed contractor. Improper DIY repair on these is the #1 cause of repeat failures because the underlying cause (usually moisture) isn't addressed. California's CSLB requires a license for any stucco work over $500. Looking for a highly-rated stucco contractor in Southern California? We are a CSLB-licensed and insured team ready to help.
How do I know if I need stucco repair vs. full re-stucco?+
If less than 30% of an elevation has visible damage, repair is the right call. If you see large areas of cracking, multiple zones of delamination, or the underlying paper and lath have rotted across an entire wall, full re-stucco of that elevation is more cost-effective long-term. Our free assessment includes a moisture survey and lath inspection so you get a defensible recommendation either way — not just a quote pushing whichever option costs more.
Do you offer warranties on stucco work?+
Yes. Stucco Champions provides a written 5-year workmanship warranty on all stucco repairs and a 10-year warranty on full re-stucco. We're a CSLB-licensed and insured contractor (license #1122006 — verifiable at cslb.ca.gov), which means our work is backed by California's contractor licensing board, not just our own promise. Request a free estimate to see the warranty terms in writing before you sign anything.
How long does a stucco repair take?+
Most patch repairs are completed in 1-2 days, including a 24-hour cure time before texture matching and color application. Full re-stucco of a single elevation runs 5-7 working days because each coat (scratch, brown, finish) needs to cure properly before the next is applied. We schedule around weather — California stucco needs daytime temperatures above 50°F with no rain forecast for at least 24 hours after each coat. Our crew shows up on time, every time.