Essential Checklist for a Smooth Stucco Project
Written by Stucco Champions — Southern California’s Authority on Exterior Plastering.
Essential Checklist for a Stucco Project: The Professional Protocol
Embarking on a re-stucco project is a significant investment. It involves scaffolding, heavy machinery, and a strict sequence of chemical curing times. If one step is missed, the building envelope system fails.
At Stucco Champions, we don't rely on memory; we rely on protocol. This checklist breaks down the non-negotiable phases of a successful project, from the initial site audit to the final texture blend.
Free Assessment
Noticing Stucco Damage?
Get a free on-site assessment from a licensed contractor. $0 deposit, no obligation.
GET FREE ASSESSMENT1. Pre-Construction: The "Discovery" Phase
Before we demolish, we must understand the building envelope:
- Substrate Audit: Is the underlying wood rotted? If we find dry rot during demolition, we must halt and repair the framing. When repairing framing, integrating the double-layer Grade D WRB cleavage plane per **CRC Section R703.7.3** is crucial.
- Window Integration: Will you replace windows? If so, they must be installed and flashed following **AAMA 2400** / **ASTM E2112** protocols before the stucco lath is applied.
- Permits & Inspections: Is a city permit active for the required structural lath inspection (mandated by **CRC Section R703.7** before plaster application)?
- Weep Screed Compliance: Ensure the foundation weep screed is kept clear: at least 4 inches above raw earth/soil and 2 inches above paved concrete, in compliance with **ASTM C1063**.
2. The Project Roadmap (Timeline)
Stucco is not a 2-day job. It is a multi-week process due to code-mandated chemical curing times:
| Phase | Key Tasks | Critical Timing |
|---|---|---|
| 1. Prep & Lath | Sandblasting, window masking, paper and wire installation. | Days 1-3 |
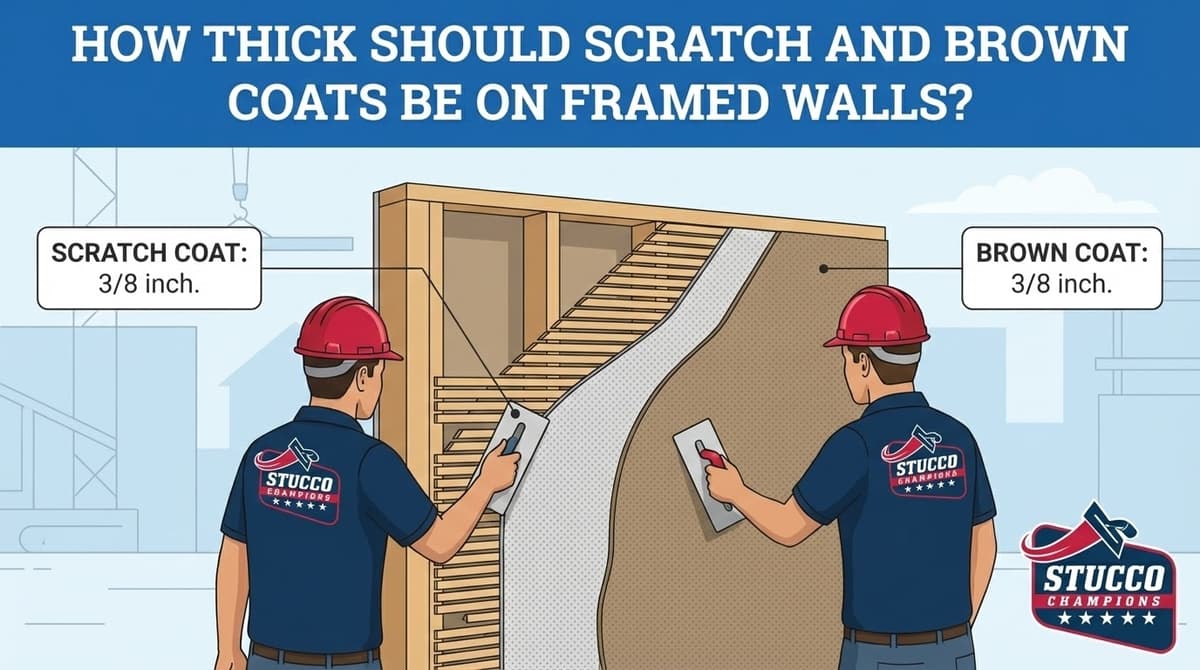
| 2. Scratch Coat | Apply first layer of cement plaster, scarify surface to key. | Day 4 (Must moist-cure 48 hrs per **ASTM C926**) |
| 3. Brown Coat | Leveling layer, rodding flat, sponge floating. | Day 6 (Must cure and dry 7-14 days per **ASTM C926**) |
| 4. Finish Coat | Final color and texture application. | Day 14+ (Final Step) |
3. The Homeowner’s Responsibility: Preparation
We handle the walls, but you must prepare the perimeter:
- Vegetation: Trim all bushes and trees back 2-3 feet from the wall. If branches touch the wet stucco, they will ruin the finish texture.
- Wall Hangings: Remove all pictures and shelves from the interior of exterior walls. The vibrations from sandblasting and lathing can knock items off shelves.
- Access: Ensure gates are unlocked and pets are secured indoors.
Sandblasting, demolition, and mixing cement create significant airborne dust. While we mask windows and protect landscaping, fine dust can still migrate through attic vents, crawlspaces, or old window seals. We highly recommend closing all windows tightly, turning off HVAC systems during active prep hours, and changing your HVAC filters immediately upon project completion.
4. Material Verification
Before the first bag is opened, verify the specifications:
- Finish Selection: Have you approved a physical 2x2 sample board? Never approve color or texture from a photo.
- Texture Type: Smooth? Sand? Lace? Ensure the crew knows the target texture before the brown coat is applied, as the base preparation and floating techniques differ for each.
Conclusion: Plan the Work, Work the Plan
A smooth stucco project is the result of rigid planning. By respecting the cure times, preparing the site, and verifying materials, we eliminate surprises. Stucco Champions follows this checklist on every job to ensure your home is treated with the engineering precision it deserves.
Read our guide on What Homeowners Need to Know Before Starting Stucco Work for a broader overview of the installation process.
Frequently Asked Questions About Stucco
How much does stucco repair cost in Orange County and Los Angeles?+
Stucco repair typically ranges from $500 for minor crack patching to $5,000+ for full re-stucco of a single elevation. The exact cost depends on the damage type (hairline cracks, water damage, delamination, weep screed failure), the square footage involved, and whether the original three-coat or one-coat stucco system needs to be matched. Stucco Champions provides fixed-price written estimates after a free on-site assessment — no hourly billing, no surprise change orders. See our stucco repair cost guide for detailed pricing by repair type.
How long does stucco last in Southern California?+
Properly installed three-coat stucco lasts 50-80+ years in Southern California's climate. The most common failure points aren't the stucco itself — they're the supporting components: corroded weep screed, deteriorated building paper behind the stucco, and improperly sealed window flashing. Most "stucco failures" are actually moisture-intrusion failures that start at one of these points. Annual visual inspection catches problems before they spread, which is why we offer free weep screed assessments for homeowners in our service area.
Can I repair stucco myself, or do I need a contractor?+
Hairline cracks under 1/8 inch wide can be sealed with elastomeric caulk by a homeowner. Anything larger — pattern cracks, delamination (where stucco pulls away from the wall), water-damaged areas, or chimney/window leak repairs — requires a licensed contractor. Improper DIY repair on these is the #1 cause of repeat failures because the underlying cause (usually moisture) isn't addressed. California's CSLB requires a license for any stucco work over $500. Looking for a highly-rated stucco contractor in Southern California? We are a CSLB-licensed and insured team ready to help.
How do I know if I need stucco repair vs. full re-stucco?+
If less than 30% of an elevation has visible damage, repair is the right call. If you see large areas of cracking, multiple zones of delamination, or the underlying paper and lath have rotted across an entire wall, full re-stucco of that elevation is more cost-effective long-term. Our free assessment includes a moisture survey and lath inspection so you get a defensible recommendation either way — not just a quote pushing whichever option costs more.
Do you offer warranties on stucco work?+
Yes. Stucco Champions provides a written 5-year workmanship warranty on all stucco repairs and a 10-year warranty on full re-stucco. We're a CSLB-licensed and insured contractor (license #1122006 — verifiable at cslb.ca.gov), which means our work is backed by California's contractor licensing board, not just our own promise. Request a free estimate to see the warranty terms in writing before you sign anything.
How long does a stucco repair take?+
Most patch repairs are completed in 1-2 days, including a 24-hour cure time before texture matching and color application. Full re-stucco of a single elevation runs 5-7 working days because each coat (scratch, brown, finish) needs to cure properly before the next is applied. We schedule around weather — California stucco needs daytime temperatures above 50°F with no rain forecast for at least 24 hours after each coat. Our crew shows up on time, every time.
Related Professional Services
A licensed assessment identifies the cause before the finish is opened or replaced.