How To Repair & Replace Damaged Stucco Weep Screed: A Comprehensive Guide
Written by Stucco Champions — Southern California’s Authority on Exterior Plastering.
How to Repair and Replace Rusted Weep Screed: An Expert Protocol
In coastal Southern California, "rust jacking" at the foundation line is a common structural threat. Salt air and moisture degrade older galvanized weep screeds, causing them to expand and crack the surrounding stucco. Replacing a weep screed is not a cosmetic patch; it is a surgical procedure on your home’s waterproofing system.
If performed incorrectly, you risk breaking the continuous drainage plane, leading to rot in your shear walls. This guide outlines the professional method for replacing damaged weep screed while maintaining code compliance.
⚠️ Safety & Scope WarningThis process involves using angle grinders on concrete and metal. Always use ANSI-rated eye protection, a dust mask, and heavy gloves. If you are dealing with more than 10 linear feet of damage, or if the screed is embedded in a slab, we highly recommend consulting a professional stucco contractor.
DIY not your thing? Get an instant estimate with our Stucco Price Calculator, then book a walkthrough.1. Surgical Demolition: Exposing the Flange
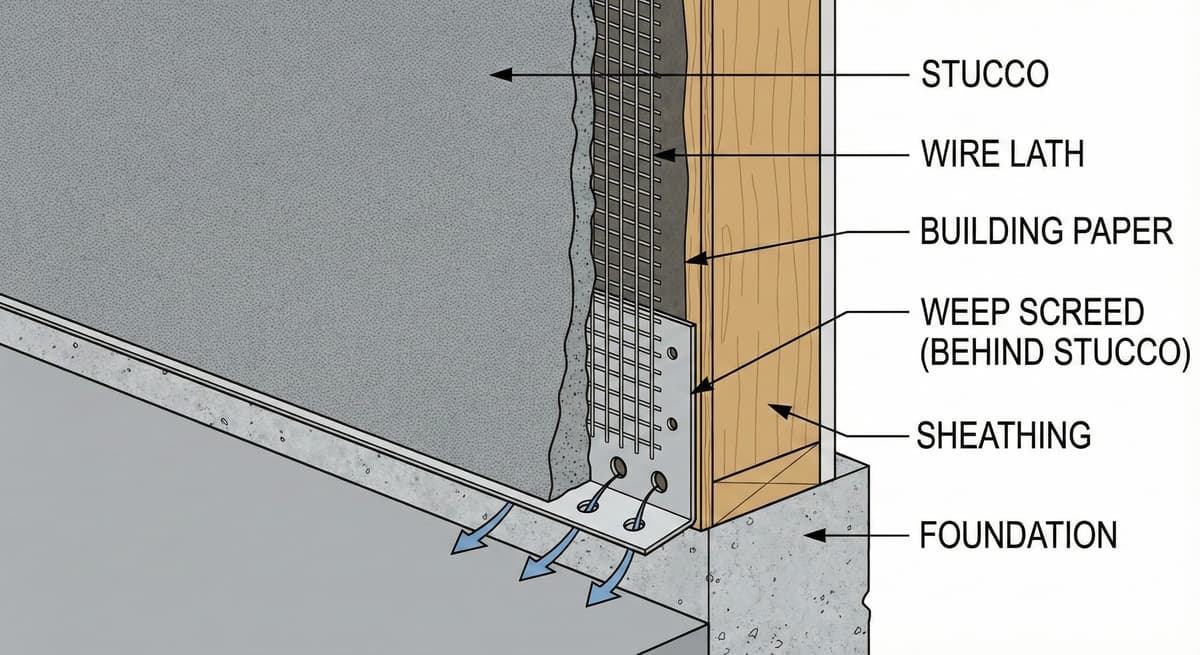
You cannot simply pull the old screed out. The screed has a 3.5-inch vertical flange nailed to the framing plate behind the stucco. To access it:
- Cut the Line: Snap a chalk line approximately 6 to 8 inches above the foundation. Use an angle grinder with a diamond blade to cut through the finish and brown coats. Do not cut deep enough to slice the wood framing studs.
- Remove Material: Use a hammer and a cold chisel (or a small demo hammer) to carefully remove the stucco below your cut line.
- Preserve the Paper: Try to avoid shredding the existing building paper behind the stucco as you work. You will need it intact to lap your new paper correctly.
Free Assessment
Noticing Stucco Damage?
Get a free on-site assessment from a licensed contractor. $0 deposit, no obligation.
GET FREE ASSESSMENT2. Removing the Rusted Metal
Once the stucco is cleared, remove the nails or staples holding the old screed to the foundation plate. If the screed is rusted through, it may crumble. Ensure all old metal fragments and corroded fasteners are removed to provide a clean surface for the new installation.
3. Installing the New Screed & Clearances
Measure and cut your new #7 Foundation Weep Screed using tin snips. When installing:
- Overlap Joints: If you need multiple pieces, overlap the metal flanges by at least 2 inches. Apply a bead of polyurethane sealant between the metal overlap (but never block the weep holes).
- Check Clearances: Per code, maintain proper separation from the ground to prevent wicking:
- Earth/Soil: Minimum 4-inch clearance required.
- Paved Surfaces: Minimum 2-inch clearance required.
4. The Critical Step: Waterproofing (The Shingle Lap)
This is where most DIY attempts fail. You cannot simply tape new paper over the gap.
You must install new Grade D building paper (we recommend 60-Minute Super Jumbo Tex) so that it slides UNDER the existing building paper at the top of your cut, and OVER the new weep screed flange at the bottom.
This "shingle lap" ensures that water running down the wall stays on top of the paper and exits through the screed. If you reverse this lap, water will run behind the new screed and rot your wall.
5. Lathing and Base Coat
Install new galvanized metal lath (wire mesh). The new wire must overlap the existing wire by at least 2 inches on all sides. Secure it with galvanized furring nails or staples, ensuring they hit the studs.
Apply a base coat (scratch and brown). For small repairs, a high-quality modified base coat (like Omega or Sika) allows for faster curing. Ensure the new cement is "keyed" into the edges of the existing stucco for a strong bond.
6. Finish and Color Matching
Once the base coat has cured, apply the finish coat. Texture matching is difficult; experiment on a test board first. Feather the edges with a wet brush to blend the new texture into the old.
Note on Painting: New stucco has a high pH that can burn paint. You must either wait 28 days for a full cure or use a pH-blocking primer before painting the repair to match the house.
Related ResourcesFor help sourcing the right metal profiles, read our guide: Where Can I Buy Weep Screed? An Expert Guide.
If you are unsure if your cracks are structural or cosmetic, review Identifying and Repairing Stucco Cracks.
Need Help With Weep Screed Repair?
Get a quick cost estimate for your project — no phone call required.