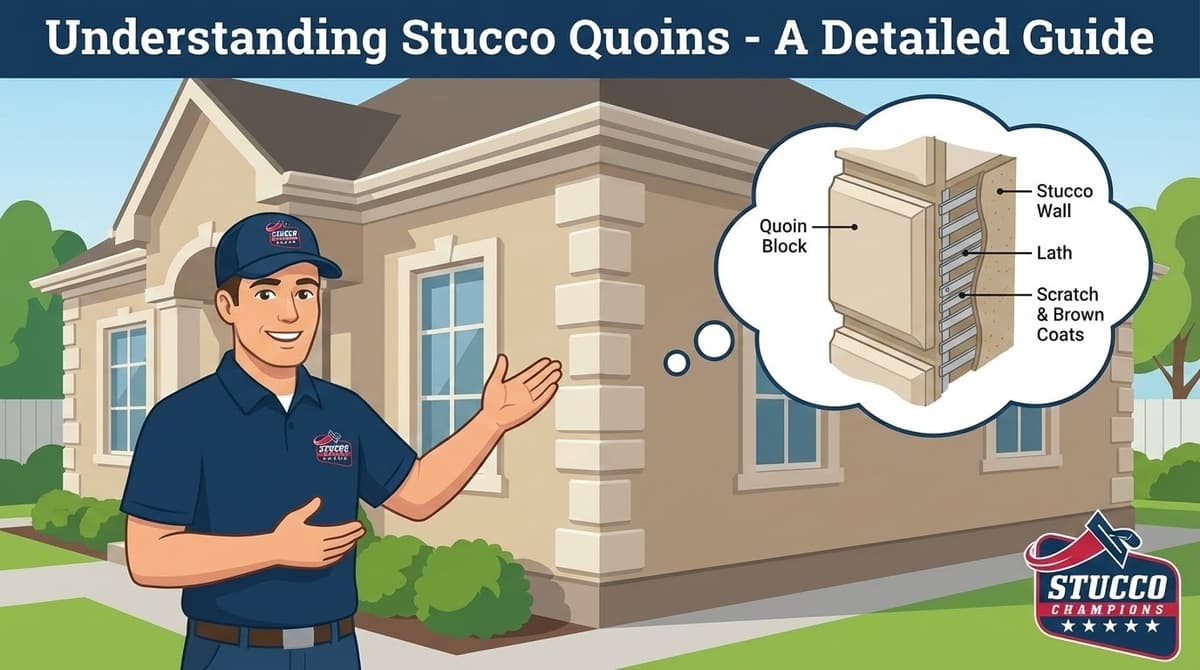
Understanding Stucco Quoins - A Detailed Guide
Written by Stucco Champions — Southern California’s Authority on Exterior Plastering.
The Architectural Edge: A Technical Guide to Stucco Quoins
In classical architecture, "Quoins" (pronounced coins) were large, structural stones placed at the corners of brick buildings to provide strength. In modern Southern California stucco design, they are purely aesthetic, but they serve a vital visual function: they frame the home, adding weight, elegance, and definition to what would otherwise be a plain box.
Whether you are designing a French Country estate in Newport Coast or updating a Mediterranean home in Mission Viejo, understanding the material composition of modern quoins—specifically the shift from metal to EPS foam—is critical for a long-lasting installation.
1. The Evolution: Foam vs. Metal
Historically, stucco quoins were built by furring out the wall with extra layers of wire lath and cement. Today, technology has evolved.
Free Assessment
Noticing Stucco Damage?
Get a free on-site assessment from a licensed contractor. $0 deposit, no obligation.
GET FREE ASSESSMENTThe Modern Standard: EPS Foam
95% of new quoins installed in SoCal are made from Expanded Polystyrene (EPS) foam (1lb or 1.5lb density).
Why?
1. Seismic Flexibility: Foam absorbs vibration. Heavy cement quoins often crack during micro-tremors; foam moves with the house.
2. Insulation: It eliminates thermal bridging at the corners.
3. Cost: It creates complex shapes without expensive wood framing.
The "Old School": Wire Lath
We still occasionally build traditional quoins using built-up wire mesh (High-Rib Lath) and solid cement. This is primarily done in high-impact zones (like the base of a commercial building) where foam might get dented by vehicles.
2. Construction of a Foam Quoin
A quality quoin isn't just a piece of Styrofoam glued to the wall. It is a composite system.
- The Core: CNC-cut EPS foam.
- The Armor: A layer of fiberglass mesh embedded in a polymer-modified base coat. This creates a hard, impact-resistant shell.
- The Finish: An acrylic or cement finish coat that matches the texture of the main house.
3. Installation Protocols
How we attach the quoin determines if it stays on the wall.
Adhesion Standard
We do not use nails or screws, which create water entry points. We use a polymer-modified adhesive mortar (like Foam-Tek or Primus). This glue creates a chemical bond between the brown coat of the wall and the back of the foam, stronger than the foam itself.
4. Design Profiles: Staggered vs. Stacked
The layout of the quoins dictates the architectural style:
- The "Gibbs" Surround (Staggered): Alternating long and short blocks. This mimics traditional English or Georgian masonry and breaks up the vertical line.
- The Stacked Column: Uniform square blocks stacked vertically. This creates a formal, modern, or Art Deco appearance.
- Chamfered Edges: We often bevel the edges of the foam to create shadow lines, making the "stone" look realistic rather than just a flat block.
5. The Water Management Warning
Adding foam to a wall changes how water flows.
⚠️ Do Not Block the Screed
A critical failure we see in DIY installations is running the quoin all the way down to the dirt/pavement.
The Rule: The quoin must terminate above the Weep Screed. If you glue foam over the weep screed, you trap moisture inside the wall, leading to mold and rot. We maintain a 2-inch clearance from the paving.
6. Customization
Because we use laser-cut foam, the design possibilities are endless. We can create arched quoins, battered (sloped) quoins, or rusticated (rough-textured) looks.
Note on Sourcing: We partner with specialized fabricators like New Image Foam to cut custom profiles to your architect's exact CAD specifications.
Conclusion: Architectural Jewelry
Quoins are the "finishing touch" that elevates a stucco exterior from standard to custom. By using modern EPS foam systems installed with proper drainage clearance, Stucco Champions ensures these details add value and beauty without compromising the waterproofing envelope.
Related Resources
Last week, we shared Guide For Stucco Application in Rainfall. If you are scheduling exterior upgrades during winter, this is essential reading.
Frequently Asked Questions About Stucco
How much does stucco repair cost in Orange County and Los Angeles?+
Stucco repair typically ranges from $500 for minor crack patching to $5,000+ for full re-stucco of a single elevation. The exact cost depends on the damage type (hairline cracks, water damage, delamination, weep screed failure), the square footage involved, and whether the original three-coat or one-coat stucco system needs to be matched. Stucco Champions provides fixed-price written estimates after a free on-site assessment — no hourly billing, no surprise change orders. See our stucco repair cost guide for detailed pricing by repair type.
How long does stucco last in Southern California?+
Properly installed three-coat stucco lasts 50-80+ years in Southern California's climate. The most common failure points aren't the stucco itself — they're the supporting components: corroded weep screed, deteriorated building paper behind the stucco, and improperly sealed window flashing. Most "stucco failures" are actually moisture-intrusion failures that start at one of these points. Annual visual inspection catches problems before they spread, which is why we offer free weep screed assessments for homeowners in our service area.
Can I repair stucco myself, or do I need a contractor?+
Hairline cracks under 1/8 inch wide can be sealed with elastomeric caulk by a homeowner. Anything larger — pattern cracks, delamination (where stucco pulls away from the wall), water-damaged areas, or chimney/window leak repairs — requires a licensed contractor. Improper DIY repair on these is the #1 cause of repeat failures because the underlying cause (usually moisture) isn't addressed. California's CSLB requires a license for any stucco work over $500. We're a CSLB-licensed and insured contractor — see our contractor team for credentials.
How do I know if I need stucco repair vs. full re-stucco?+
If less than 30% of an elevation has visible damage, repair is the right call. If you see large areas of cracking, multiple zones of delamination, or the underlying paper and lath have rotted across an entire wall, full re-stucco of that elevation is more cost-effective long-term. Our free assessment includes a moisture survey and lath inspection so you get a defensible recommendation either way — not just a quote pushing whichever option costs more.
Do you offer warranties on stucco work?+
Yes. Stucco Champions provides a written 5-year workmanship warranty on all stucco repairs and a 10-year warranty on full re-stucco. We're a CSLB-licensed and insured contractor (license #1122006 — verifiable at cslb.ca.gov), which means our work is backed by California's contractor licensing board, not just our own promise. Request a free estimate to see the warranty terms in writing before you sign anything.
How long does a stucco repair take?+
Most patch repairs are completed in 1-2 days, including a 24-hour cure time before texture matching and color application. Full re-stucco of a single elevation runs 5-7 working days because each coat (scratch, brown, finish) needs to cure properly before the next is applied. We schedule around weather — California stucco needs daytime temperatures above 50°F with no rain forecast for at least 24 hours after each coat. Our crew shows up on time, every time.