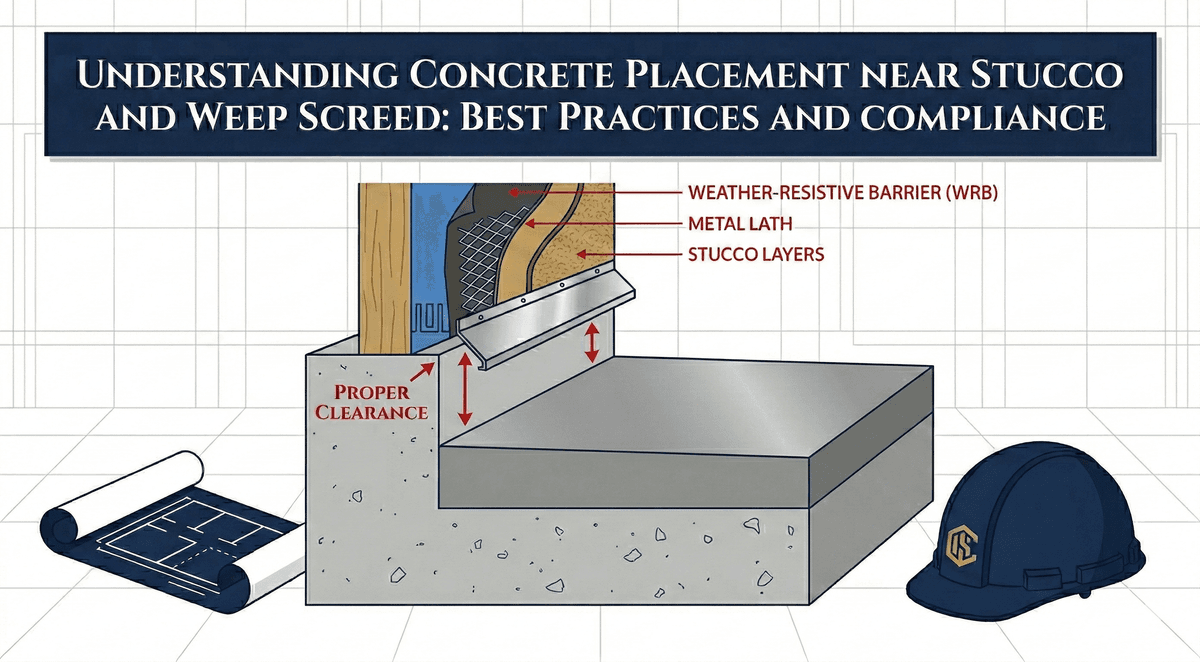
Understanding Concrete Placement Near Stucco and Weep Screed: Best Practices and Compliance
Written by Stucco Champions — Southern California’s Authority on Exterior Plastering.
The Hardscape Conflict: Concrete Placement Near Stucco and Weep Screed
A new concrete driveway or patio is a great addition to your home, but it often puts your stucco at risk. Concrete contractors focus on grade and drainage for the patio, but they frequently overlook the drainage requirements of the wall itself.
If concrete is poured too high—covering the weep screed—you create a moisture dam. The water trapped inside the wall has nowhere to exit, leading to rot in the mudsill and studs. This guide explains the strict code clearances required when hardscape meets stucco.
Planning a patio pour? Check your weep screed clearance first with our Free Weep Screed Assessment.1. The 2-Inch Rule (CRC Requirement)
According to the California Residential Code and ASTM standards, you cannot pour concrete flush with the bottom of the stucco.
The Code: 2-Inch ClearanceThe bottom of the weep screed must be at least 2 inches above the finished surface of any paved area (concrete, pavers, or asphalt).
Why 2 Inches?
1. Splashback: Heavy rain bounces off concrete. The gap prevents splashing water from entering the weep holes.
2. Drainage: It ensures the weep screed can freely drip water out of the wall assembly.
Free Assessment
Noticing Stucco Damage?
Get a free on-site assessment from a licensed contractor. $0 deposit, no obligation.
GET FREE ASSESSMENT2. The "Isolation Joint" Necessity
Even if you maintain the vertical clearance, you must separate the horizontal concrete slab from the foundation.
We recommend installing Expansion Foam (Isolation Joint) between the new concrete pour and the house foundation.
Why? Concrete expands and contracts with heat. If you pour directly against the house, the expanding slab can push against the foundation, cracking the stucco above it.
Use our Weep Screed Test to check your home now.
Planning a patio? Don't let them pour until you read this. Get the Concrete Protection Guide sent to your inbox.
3. When You Must Pour High: The "Screed Lift"
Sometimes, site conditions (like slope or ADA accessibility) force the concrete to be higher than the existing weep screed. You cannot just bury the screed. You must raise the system.
This is a surgical procedure known as a Screed Lift:
- Demolition: We cut a horizontal line in the stucco about 6-8 inches above the new proposed concrete height.
- Flashing: We install a Z-bar metal flashing or counter-flashing paper to ensure water kicks out at the new height.
- New Screed: We install a new #7 weep screed at the higher elevation.
- Patching: We repair the stucco to match the existing texture.
This effectively raises the "exit door" of the wall so the new concrete can be poured safely below it.
4. Managing "Covered" Areas
Homeowners often ask: "My patio has a roof over it. Do I still need the gap?"
Technically, Yes. While the risk of rain splashback is lower, you still have moisture moving inside the wall (condensation). The weep screed must remain open to exhaust this moisture. Even in a covered patio, burying the screed risks trapping internal humidity and inviting termites.
5. Correcting Existing Violations
If you already have a patio poured against your stucco without a weep screed, check for these warning signs:
- Blistering Paint: Bubbles near the ground indicate water trying to get out.
- Efflorescence: White salty powder on the stucco means water is wicking up from the concrete.
The Fix: If lowering the concrete isn't an option, we can sometimes cut a Retrofit Channel between the concrete and the wall to install a remedial flashing system, though a full screed lift is safer.
Related ResourcesLast week, we shared Exploring Stucco and Brick House Designs. Combining masonry with stucco requires specific detailing to prevent cracks. Check it out for design inspiration.
Concerned About Concrete Near Your Weep Screed?
Our free visual self-check helps you assess your weep screed's condition in 2 minutes.