Written by Stucco Champions — Southern California’s Authority on Exterior Plastering.
The Great Divide: Stucco Control vs. Expansion Joints Explained
Stucco is a rigid material living in a moving world. Between Southern California’s seismic activity and the daily cycle of thermal expansion (hot sun) and contraction (cool nights), your exterior walls are under constant stress. If you do not give the stucco a designated place to move, it will crack.
This guide demystifies the two critical components used to manage this movement: Control Joints and Expansion Joints. While they look similar, they serve very different structural roles.
1. The Control Joint (Handling Shrinkage)
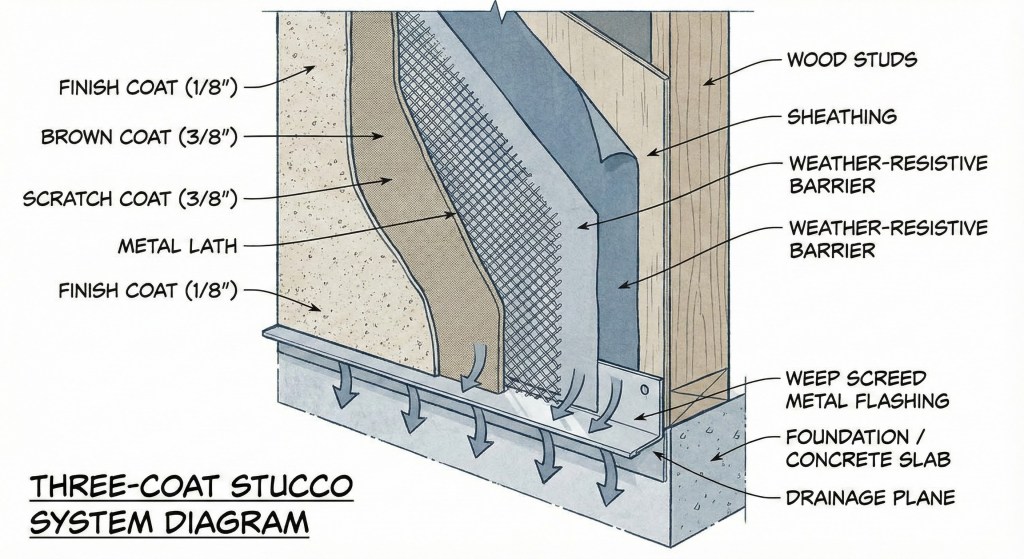
Also known as the "C-Joint" or "M-Joint" (due to its accordion-like shape), this is a single-piece metal strip installed within a field of stucco.
Function: As wet cement cures, it shrinks. The Control Joint creates a weak point where the stucco can pull apart slightly without creating a jagged crack across the face of the wall.
Appearance: A small, vertical or horizontal channel, usually 1/4" to 3/8" wide, painted to match the wall.
2. The Expansion Joint (Handling Structure)
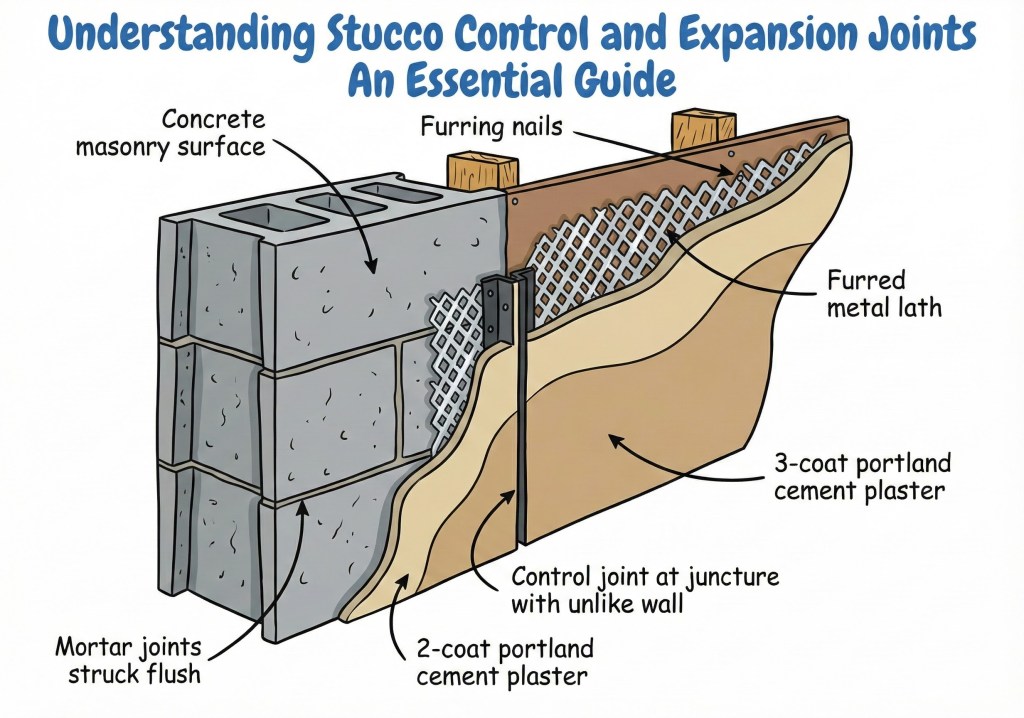
An Expansion Joint is designed for significant structural movement. It is typically a "two-piece" system (often two Casing Beads installed back-to-back with a gap).
Function: It allows two sections of the building to move independently of each other.
Where Required:
- Dissimilar Materials: Where a wood-framed addition meets a concrete block garage.
- Floor Lines: Between the first and second story (where rim joists compress).
- Through-Wall breaks: Where the building shape changes significantly.
3. The Rules of Placement (ASTM C1063)
You cannot just place joints randomly. To maintain warranty and code compliance, we follow strict spacing rules:
- Max Area: No single stucco panel can exceed 144 square feet.
- Max Length: No single dimension can exceed 18 linear feet.
- Shape: Panels should remain as square as possible. Long, skinny panels (exceeding a 2.5:1 length-to-width ratio) are prone to cracking.
4. The Most Common Failure: "Cutting the Lath"
This is the single most important technical detail in this guide.
For a Control Joint to function, the wire lath (mesh) behind it must be cut. If a contractor nails a control joint on top of continuous wire mesh, the joint is useless. The wire will hold the wall together, preventing the joint from opening, and the stucco will crack elsewhere. The joint effectively separates the wall into two independent slabs.
5. Aesthetics: Hiding the Hardware
Architects often dislike joints because they interrupt clean lines. To minimize visual impact:
- Strategic Alignment: We align joints with the edges of windows or doors (where stress cracks naturally form anyway).
- The "Reveal" Look: Instead of the standard V-shape, we can use a "Channel Screed" which creates a crisp, square shadow line that looks like a modern architectural feature.
- Belly Bands: On two-story homes, we often hide the horizontal expansion joint behind a decorative foam trim or "belly band."
6. Maintenance and Sealants
While the metal joint lasts forever, the sealant (caulk) inside an Expansion Joint does not.
Maintenance Tip: Inspect your expansion joints every 3-5 years. If the sealant is dried or cracking, water can enter the wall assembly. It must be cut out and replaced with a high-quality polyurethane sealant.
Conclusion
Control joints are not optional suggestions; they are required components of a healthy stucco system. By planning their placement carefully, we can protect your home from cracking while maintaining a beautiful aesthetic.
Last week, we shared Comprehensive Guide to Plaster Stop in Stucco Applications. Learn how we terminate stucco edges cleanly at doors and windows.