Stucco Movement Joints for Additions, Floor Lines & Material Changes
Stucco Movement Joints for Additions, Floor Lines & Material Changes
Stucco movement joints matter most where the wall assembly changes. Additions, floor lines, masonry-to-wood transitions, and existing construction joints can move differently than the surrounding plaster. If those movement lines are covered with continuous lath and stucco, cracking is predictable.
This page focuses on remodel and transition conditions. For basic ASTM C1063 panel-size limits, use a dedicated control-joint layout guide. For repairs, the key question is whether the joint is supposed to move and whether the lath, WRB, plaster, and sealant details allow it to do so.
Free Assessment
Noticing Stucco Damage?
Get a free on-site assessment from a licensed contractor. $0 deposit, no obligation.
GET FREE ASSESSMENTControl Joint vs. Movement Joint
In field language, control joint, expansion joint, and movement joint are often used loosely. The PCA manual notes that manufacturers may use terms such as control joint, expansion joint, and expansion-control joint for accessories that relieve stress between plaster segments.
The practical distinction is:
- Control joints divide plaster fields into smaller panels to reduce shrinkage and stress cracking.
- Movement or expansion joints are used where larger building or substrate movement is expected.
Where Movement Joints Matter Most
- Room additions: New framing next to older framing often moves differently.
- Wood-to-masonry transitions: Framed walls, CMU, concrete, and steel do not move the same way.
- Floor lines: Multi-story framed walls can shrink or move at plate and rim-joist areas.
- Existing building joints: Construction, expansion, or control joints in the base should continue through the plaster.
- Large offsets or changes in plane: Building shape changes can concentrate stress.
The Lath Cannot Bridge the Joint
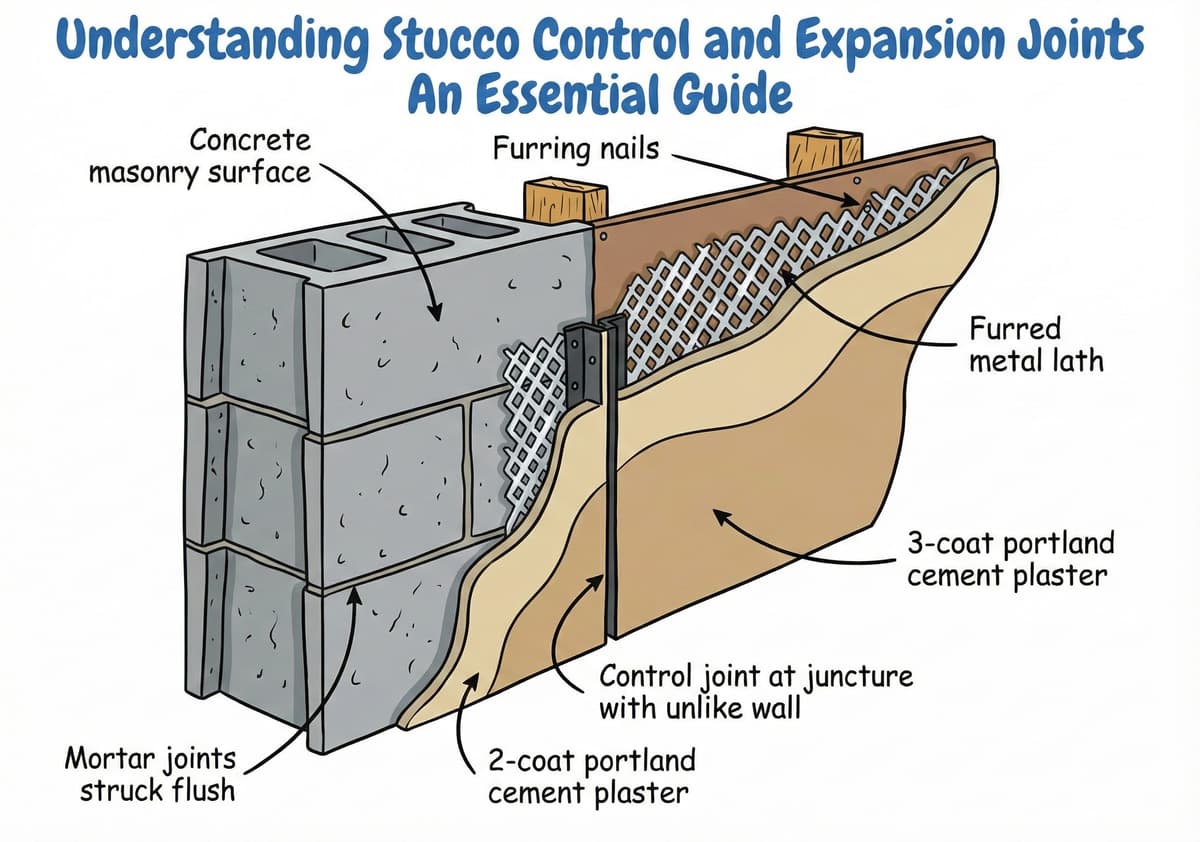
A functioning movement joint requires separation. The PCA manual states that metal reinforcement should stop at each side of a control joint and not continue through it. If the lath runs continuously through the joint, the plaster panels are tied together and the joint cannot relieve movement as intended.
The WRB should continue and be integrated behind the joint in a weather-resistive way. Joint terminations and intersections must be sealed or flashed so water is not directed into the wall.
Back-to-Back Casing Beads and Sealant Joints
Some movement details use back-to-back casing beads with a flexible barrier membrane behind them. The manual notes that ASTM C1063 allows this approach and that minimum separation is required, with larger gaps sometimes specified depending on movement and exposure.
Where sealant is part of the detail, the joint should be sized and prepared for backer rod and compatible exterior sealant. Rigid stucco patch should not be packed into a joint that is intended to move.
Common Remodel Mistakes
- Lathing continuously across an addition seam.
- Ignoring an existing construction joint in the base.
- Using finish coat or paint to hide a recurring movement crack.
- Filling movement joints with hard cement patch.
- Leaving sealant joints unmaintained until water enters.
- Adding decorative foam or trim that traps water at the joint.
Maintenance Expectations
Movement joints may include sealant, and sealant is a maintenance item. It can harden, split, debond, or shrink. Inspect joints periodically, especially around additions, window bands, floor lines, decks, and transitions where water exposure is high.
If a joint is cracked, leaking, or filled with rigid material, repair should address the joint function—not just the surface appearance.
Bottom Line
Stucco movement joints are most important where the building changes. Additions, floor lines, wood-to-masonry transitions, and existing base joints should be planned before lath installation. The joint works only when lath separation, WRB continuity, accessory detailing, and sealant maintenance are handled correctly.
Frequently Asked Questions About Stucco
How much does stucco repair cost in Orange County and Los Angeles?+
Stucco repair typically ranges from $500 for minor crack patching to $5,000+ for full re-stucco of a single elevation. The exact cost depends on the damage type (hairline cracks, water damage, delamination, weep screed failure), the square footage involved, and whether the original three-coat or one-coat stucco system needs to be matched. Stucco Champions provides fixed-price written estimates after a free on-site assessment — no hourly billing, no surprise change orders. See our stucco repair cost guide for detailed pricing by repair type.
How long does stucco last in Southern California?+
Properly installed three-coat stucco lasts 50-80+ years in Southern California's climate. The most common failure points aren't the stucco itself — they're the supporting components: corroded weep screed, deteriorated building paper behind the stucco, and improperly sealed window flashing. Most "stucco failures" are actually moisture-intrusion failures that start at one of these points. Annual visual inspection catches problems before they spread, which is why we offer free weep screed assessments for homeowners in our service area.
Can I repair stucco myself, or do I need a contractor?+
Hairline cracks under 1/8 inch wide can be sealed with elastomeric caulk by a homeowner. Anything larger — pattern cracks, delamination (where stucco pulls away from the wall), water-damaged areas, or chimney/window leak repairs — requires a licensed contractor. Improper DIY repair on these is the #1 cause of repeat failures because the underlying cause (usually moisture) isn't addressed. California's CSLB requires a license for any stucco work over $500. Looking for a highly-rated stucco contractor in Southern California? We are a CSLB-licensed and insured team ready to help.
How do I know if I need stucco repair vs. full re-stucco?+
If less than 30% of an elevation has visible damage, repair is the right call. If you see large areas of cracking, multiple zones of delamination, or the underlying paper and lath have rotted across an entire wall, full re-stucco of that elevation is more cost-effective long-term. Our free assessment includes a moisture survey and lath inspection so you get a defensible recommendation either way — not just a quote pushing whichever option costs more.
Do you offer warranties on stucco work?+
Approved stucco repair work includes a 1-year written workmanship warranty. The applicable terms are documented with the approved scope. Stucco Champions is CSLB licensed and insured; verify license #1122006 through the official state lookup. Request a free estimate to review the scope and warranty terms before you sign.
How long does a stucco repair take?+
Most patch repairs are completed in 1-2 days, including a 24-hour cure time before texture matching and color application. Full re-stucco of a single elevation runs 5-7 working days because each coat (scratch, brown, finish) needs to cure properly before the next is applied. We schedule around weather — California stucco needs daytime temperatures above 50°F with no rain forecast for at least 24 hours after each coat. Our crew shows up on time, every time.
Stucco Diagnostics & Calculators
Diagnose specific wall damage symptoms or estimate job scope with our free guides and calculators.
Related Professional Services
A licensed assessment identifies the cause before the finish is opened or replaced.