Fastening Tips for Stucco That Lasts
Written by Stucco Champions — Southern California’s Authority on Exterior Plastering.
Fastening Tips for Stucco Projects: The Science of Shear Strength
Most homeowners focus on the finish coat—smooth, sand, or lace. However, the longevity of that finish depends entirely on the nailing schedule of the substrate beneath it. In Southern California, plywood or OSB sheathing does more than hold up the stucco; it acts as the Shear Wall that keeps your home from racking during an earthquake.
If the sheathing is loose, or if the nails are overdriven, the structural integrity of the wall is compromised. This guide breaks down the fastening protocols required by the IRC (International Residential Code) and APA (The Engineered Wood Association).
1. Why Fastening Matters
Stucco is a rigid system. If the wood surface beneath it shifts, the stucco will crack. Proper fastening ensures that the sheathing acts as a monolithic unit with the framing.
- Seismic Stability: In high-seismic zones (like Los Angeles and Orange County), the nailing pattern transfers lateral forces from the roof to the foundation.
- Surface Flatness: Loose panels will bow outward, creating visible humps in the finished wall.
- Moisture Control: Properly fastened panels prevent gaps where moisture can accumulate.
Free Assessment
Noticing Stucco Damage?
Get a free on-site assessment from a licensed contractor. 0 deposit, no money upfront, progress payments only.
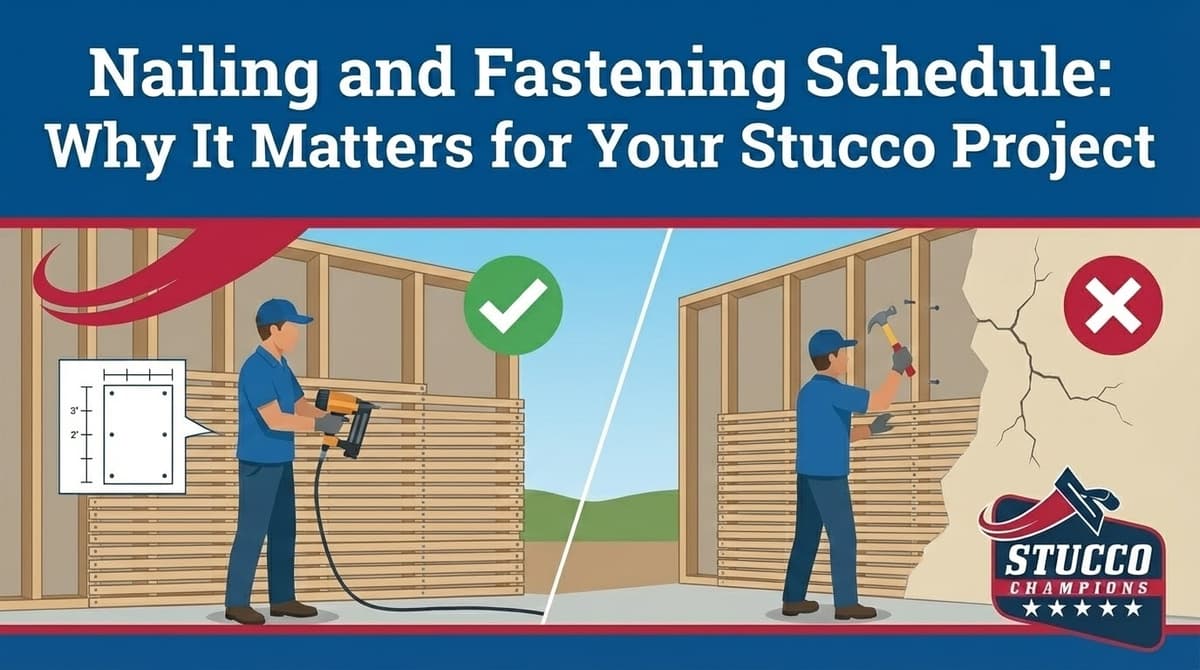
GET FREE ASSESSMENT2. The "6 and 12" Rule
The code-mandated nailing schedule for wall sheathing is strict. You cannot just "tack it up."
| Location | Spacing Requirement | Why? |
|---|---|---|
| Panel Edges | Every 6 inches | Transfers shear load at the perimeter of the sheet. |
| Field (Center) | Every 12 inches | Prevents the panel from bowing in the middle. |
| Fastener Type | 8d Common Nails (2.5") | Provides sufficient withdrawal strength. |
High-Wind/Seismic Zones
In certain engineering plans, you may see a "4 and 12" or even "3 and 12" schedule. This means edge nails must be spaced every 3 or 4 inches. Always follow the structural engineer's plan over general code.
3. The Problem with "Shiners" (Missed Studs)
A "shiner" is a nail that misses the stud and sticks out the back of the sheathing.
The Risk: It provides zero holding power. It is a hole in your shear wall.
The Fix: You must remove the shiner and drive a new nail into solid wood. Simply adding a nail next to it is often insufficient if the panel integrity is compromised.
4. Depth Control: Overdriven Nails
This is the #1 failure we see with pneumatic nail guns.
| Issue | Cause | Consequence |
|---|---|---|
| Overdriven Nail | Air pressure too high; head buried deep into wood. | Crushes wood fibers; holding power reduced by up to 50%. Fail. |
| Underdriven Nail | Air pressure too low; head sticking out. | Prevents stucco paper/lath from sitting flat. Creates a hump. |
| Flush Nail | Correct pressure. | Head sits tight against the surface without breaking the skin. Pass. |
5. Roof Sheathing Considerations
Stucco often meets the roofline at eaves and soffits. Roof sheathing follows similar rules but often carries different loads.
- Edge Spacing: Every 6 inches.
- Field Spacing: Every 12 inches.
- Clips: H-Clips may be required between trusses to allow for expansion without sagging.
Conclusion: The Skeleton must be Rigid
Before we apply paper, wire, or cement, the skeleton of the house must be rigid. If the sheathing moves, the stucco cracks. By adhering to strict nailing schedules and depth controls, Stucco Champions ensures the substrate is ready to carry the weight of a 50-year exterior.
Related Resources
Last week, we shared Sheathing for Stucco: Plywood vs OSB. Learn about the material differences before you nail it up.